Above is my Gosford complete with the Overhead. Click on the photo to see the Main North Album at Flickr

Saturday, March 21, 2015

Sound for the 48s.


I have installed sound decoders into 3 versions of 48s - early and late Powerline and just recently into my long awaited Trainorama 48s. I have a DCC sound installation page on the latest Powerline on my web site at: http://members.optusnet.com.au/nswmn1/48Select3.htm using a Loksound Select Direct decoder with the prototypical correct 251B 6 cylinder sound and a MRC 18 mm speaker. I was never able to verify whether I had a 6 cyl sound but I hated the sound as it had too much turbo. On my layout, if I don't like the sound I'm not going to install it in my models. Call me Mr "close enough" sound man. Using Loksound decoders you can change the sound file but you cannot with Soundtraxx Tsunamis making it an advantage using the upgrade-able decoders.

The era for my Main North layout is 1965 - locos from from Gosford to Newcastle/Werris Creek were mostly steam. I only have a few diesel hauled trains - a Triple 48s "wheatie" (22 BWHs) from Werris Creek and a couple of "staged" 44 hauled North Coast trains - all hardly ever run. Two of my 44s are equipped with Loksounds with in my opinion, the bloody awful  turbo 251 sound, so I thought I remove the Loksounds and put them into my recently arrived 46s. I need a few "electric" sound decoders so Loksound is the go with the 46s. Thanks to Chris Winston I have a superb V4.0 Loksound equipped 46. Now to make "electric" sound for the these older Loksounds but for now the GG1 sound will do.

The 48s will not be run much and as I'm a cheapskate I thought I'd fit my old DSD100-LC diesels into 3 of my Trainorama 48s using the original speaker - tinny sound but cheap. Two of these DSD equipped 48s are consisted with the 244 Tsunami equipped 4th 48 that'll be the "lead" loco of the with it's Horn being the one that is sounded in the Consist. Many of my locos including the Trainorama 48s have the Sugar Cube speakers from Streamlined Backshop - fantastic sound until.....

Recently I had to help a modeller with his his Loksound Select 251 equipped 48. The sound was woeful, too soft and poor performance. I reloaded the sound project and tinkered with the Speed Table etc and it still sounded woeful. He previously suggested his other 48 had too much turbo sound. I loaded a 244 and fitted a 15 x 11 x 8mm Sugar Cube speaker from SBS4DCC.

WOW!!! what a difference. I took it to another layout to "show off" the sound and one modeller said it just sounds like what I remembers the 48s sounded like.

Today I upgraded all of my Loksound Select equipped Diesels with the Loksound Alco 244 Project No 73401 and I am "seriously" thinking of getting rid of my "steamers" and move to the 80s.

Investigating the "sound" of a 48 I found a few Youtubes, where for me, they sound like the 244 sound file for both Loksound and Tsunami. I made a movie (below) where I have added the "real" sounds and the manufactured decoder sounds for the loco when it's idling and accelerating, where an easy convenient comparison of the sounds can be made.

See what you think about the "244" 48s with the Streamlined Backshop 15 x 11 x 8 Sugar Cube Speakers, sounds like compared to the "real thing".


Also see my previous Blog post and for my 48 Decoder Installation web page, see:

http://www.members.optusnet.com.au/nswmn1/48T

Below video shows my Loksound equipped 4803 on my Main North layout crossing the Pages River, north of Murrurundi.


Tuesday, March 10, 2015

Sugar Cube Speakers from SBS4DCC - Unbelievable.


I have previously used small speakers that were advertised as Sugar Cube but these ones from Streamlined Backshop are going to revolutionize sound installations in small HO locos like in my fleet of NSWGR locos. The sound is amazing and their small size (15L x 11W x 8H mm) including Enclosure make them so easy to fit in any model.

Recently I added sound to my Trainorama 48s and the 17mm internal width of the body makes fitting a Speaker difficult, except in the wider Cabin part of the body, many including me, used the supplied speaker, resulting in a volume too low and a really" tinny" sound.

I fitted a SBS4DCC Sugar Cubes with a MASSIVE improvement in the sound quality.

Discussion on the Yahoo groups and listening to the Speakers on Laurie McLean's Cube Speaker Sound Board at:

https://www.youtube.com/watch?v=N3B__iNYyNU

Not all Sugar Cube speakers are the same. Use the ones from Streamlined Backshop in the U.S. at:

http://www.sbs4dcc.com/sugarcubespeakers.html

I have experimented with a "stereo" installation, using a QSI Titan into a 22 cm (9") long HO Austrains C36, to see how the "stereo" effect sounded. The internal diameter of the C36's Smokebox is 20mm so I fitted a small QSI/Tonys round speaker that resulted in a really "tinny" Chuff and low in volume. Because of this "tinny" sound, I abandoned the idea of a "front" speaker for a stereo sound installation and went back to "mono" from the High Bass in the Tender.

Some time later I revisited the "front" speaker installation using a MRC 18 mm Round Speaker into another C36 and the sound from this speaker, compared to the previous "stereo" speaker, provided an adequate "front" speaker installation.

I fitted one of my new SBS4DCC Sugar Cubes to another C36 and compared the results using the same Tsunami Light decoders with identical "set up" CV values. The SBS Sugar Cubes sound much better and with the smaller overall size and format/footprint, makes them easier to install. These are the go for speakers in all my NSW loco fleet.

The video below compares the sound from a SBS4DCC's 15 x 11 x 8 mm Sugar Cube to Tony's 15 mm high 27 mm round High Bass, the photo below shows their relative size.


With the SBS Sugar Cubes, the Austrains C36 lends itself to an easy Smokebox speaker installation as the front is easily removed. Using my faithful form of of "re-useable" glue - Blu Tack, I "glued" the SBS Sugar Cube to the "inside" of the front of the Smokebox. I also added Blu Tack "around the Enclosure to reduce the vibrations, as shown below.


I wired up the speaker to the Tsunami Light decoder in the Tender via a changeover switch so I could switch between speakers while running the loco to demonstrate the two speakers for the video. I adjusted the volume a little louder than I usually have in my locos, to 100 out of 255 and  as usual I had adjusted the Tsunami's Equalizer to boost the higher frequencies, for the video.

The speaker did not distort when I adjusted the sound to the maximum and when the Whistle was blown, it was still clear with no distortion. I then adjusted the Tsunamis overall volume to where I normally have it for my locos (50 out of 255).

Unbelievable performance from such a small speaker.

My previous "go to" speaker due to it's great performance, was Tony's 27 x 15 mm High Bass speaker. It's size prevented it from being fitted to many locos, especially in my thin body Diesels but now with the SBS Sugar Cubes we can have great performance and volume with a much smaller package, so poor sounding sound locos are a thing of the past.

Plus these small SBS Sugar Cubes can be installed in the "front" (Smokebox/Boiler) of the Steam loco where many have wanted their sounds to come from - just like in the prototype.

What I have found, while operating with "loud/high" volumes and watching/following the loco, the "front" sound installation is very noticeable. Operating with low volumes is not so noticeable. With the loud loco sound that I witness on some of the layouts I visit and some visitors who bring their locos to the Main North, the "front" installation will be most beneficial. In any event I will be converting many of my steamers to be "front" runners.

A comparison of Sugar Cube Speakers at SBS4DCC, can be seen/heard at:

https://www.youtube.com/watch?v=bZdx0kupIDc

The below video compares the sound from the SBS4DCC speaker with a Tony's 27mm High Bass speaker. While the 27mm from Tonys sounded "bassier" and slightly louder, the much smaller SBS4DCC performed admirably with just a little less bass and volume.


The below video compares the 11 x 15 SBS4DCC Sugar Cube and a TVW Miniatures 11 x 15 Cell Phone speaker in my new Auscision 45.


For lots of DCC stuff, see my Main North web site at:
http://www.members.optusnet.com.au/nswmn/


Thursday, September 25, 2014

Uncoupling at Ardglen automatically.


March 2015 - Update. What I am doing when uncoupling the Banker at Ardglen,

On the Banker loco the front Kadee Coupler's Claw is permanently locked open using Blu Tack (modify for a more permanent fix later), preventing the Banker from coupling up to the Guards Van. The only issue with this method, the driver of the Banker must be very vigilant and to not allow the Banker to "separate" from the Guards Van - not very prototypical but this method allows simple and easy uncoupling anywhere at Ardglen. 
NOTE: I have tried pushing the Banker against the Buffers of the Guards Van but due to small (24 inch) radius of my curves, the Buffers, LOCK and this is too dangerous on the Main North, Ardglen is 1,500 mm above the cement floor. See my Banking video at:
https://www.youtube.com/watch?v=zjhofHUrMJs

Adding ballast to the track is the final major chore to finishing a "scene" so I better mount some Uncouplers at Gosford, necessary for the "change of loco" for trains going to/from Sydney, at Ardglen to "disconnect" the "rear end" Banker and other places.

I am experimenting with the Kadee 321 Permanent Magnet "ramps" and Electromagnetic Uncouplers from a Dec 91 AMRM article, similar to the Kadee 307.
. 
I have temporarily fitted the Kadee 321s to one of the Exchange Sidings at my Sulphide Smelter Works and using "Delayed Action" uncoupling to shunt the 16 wagons into their appropriate Siding. I have also fitted these 321s to Gosford Yard for the "change of engine" procedure. Many of you would have already experienced, these 321 magnet cause unwanted uncouplings when going slow over them. Their ease of operation with no buttons to be pressed and held, while using the Throttle to "reverse/slow" the loco/train, their ease of installation and cheapness, sort of offsets the unwanted uncouplings. Well maybe, time will tell.

I need to "uncouple" the Banker at Ardglen, that's 1700 mm off the concrete floor. How would I do this:
  1. Fit a cover over the Front Coupler or something along these lines.
  2. Remove the Claw part of the Front Kadee so as it could not couple - sounded good.
  3. Don't have a Front Coupler on the Banker and use the Buffers on both the loco and Van - sounds good but buffer lock is possible and maybe damage with the loco/Van making a trip to the floor.
  4. Fit a Kadee 321 magnet but there are "unwanted uncouplings".
  5. Fit an Electromagnet Uncoupler. 
I decided on using one of my Bob Olde Electromagnet units. Now to operate it.

Just press a button at the appropriate time while slowing the train/loco with your Throttle. Well you know me I've got to add some DCC/electrics here. As I don't want any DCC input to the Uncoupler, it'll just be electrics this time.

Electromagnet units draw a couple of Amps and need DC or AC. So I needed to install a Button, Relay and Power Supply. Mark I version was okay with just the button/relay and 20 Volt DC Power Supply, but "needed" to "automate" it. I'll spend days on hobby electronics stuff but won't fit Accessory decoders and Point Motors to Points. That's another story.

I made a 15 second Timer to energise the Relay so I did not have to hold down the button and I installed an "In Track" Sensor firstly a Reed Switch and a Magnet under the Banker's Tender. but other locos energised the Uncoupler when their speaker's magnet, energised the Reed Switch. Mark III was born with using IR LED and Sensor operating another home made circuit based on a LM339 Comparator chip. Eureka no more phantom uncouplings. Note: I use Rob Paisley's :Electronics for Model Railways" site, at:
                          http://home.cogeco.ca/~rpaisley4/CircuitIndex.html

Now for a bigger problem that I did not initially see but I have had problems with circuits using 555 Timer ICs, in the past, the Timer circuit would energise the relay/Uncoupler whenever a Fluorescent Light was turned on or off and when initially powering the Power Supply. Two days later and continual modifications to the "my" circuit built on Veroboard, shown below, it works.


My Murrurundi Bankers will be only located at Murrurundi Loco and they'll be my two DJH 50 Class locos but for the time being while testing I'm using an Austarins C36 as it was easy to add the IR LED into the Tender's floor and connect it to the decoder's internal 12.0 Volts DC via a 1 k resistor. So whenever this loco is powered, the IR LED is shinning it's IR light on the centre of the tracks. I hope it does not discolour my ballast.

All that's necessary for the Operators is to do, is:
  1. The FRONT loco operator slows down his loco as the Van approaches the "Tree" (see video), to take the tension out of the couplers that introduces coupler SLACK that's necessary for uncoupling, With the middle of the Van behind the Tree, the fascia LED is illuminated indicating the Uncoupler has energised (15 seconds).
  2. The REAR operator slows loco to a STOP when the Van/Loco Couplers, lines up with the Tree.
NOTE: The above procedure would be more difficult with medium to high values of Momentum in the Banker loco.

With the "On the Fly" uncoupling done, the operator of the Banker would either return back to Murrurundi (most cases) or run around the train and proceed to Werris Creek "in front of" the train or double head with the train loco, depending on Banker engine requirements. As there is only 15 feet from Ardglen to Werris Creek as compared to the 60 feet from Murrurundi to Ardglen, rear end "banking" will be only done on DOWN trains from Murrurundi to Ardglen.

While this Electromagnet type of Uncoupler  is what's fitted to Ardglen and provides near to 100% operation, I am still choosing which type to install at Gosford and other locations. The Electromagnetic types have the front running but the ease of installations of the magnets are gaining momentum but depending on how many of the "unwanted uncouplings" happen in my experimental locations over the next few months, will determine the final outcome.

The video shows banking up to the Ardglen Tunnel and then automatically un-coupling at Ardglen.


Saturday, August 9, 2014

Signalling the Broadmeadow to Werris Creek section my way.


January 2017 update: I have replaced the Colour Light Signals with Lower Quadrant Semaphores, see the below Blog entry at:

http://mainnorth.blogspot.com.au/2017/01/adding-ray-pilgrims-shapeways-semaphore.html

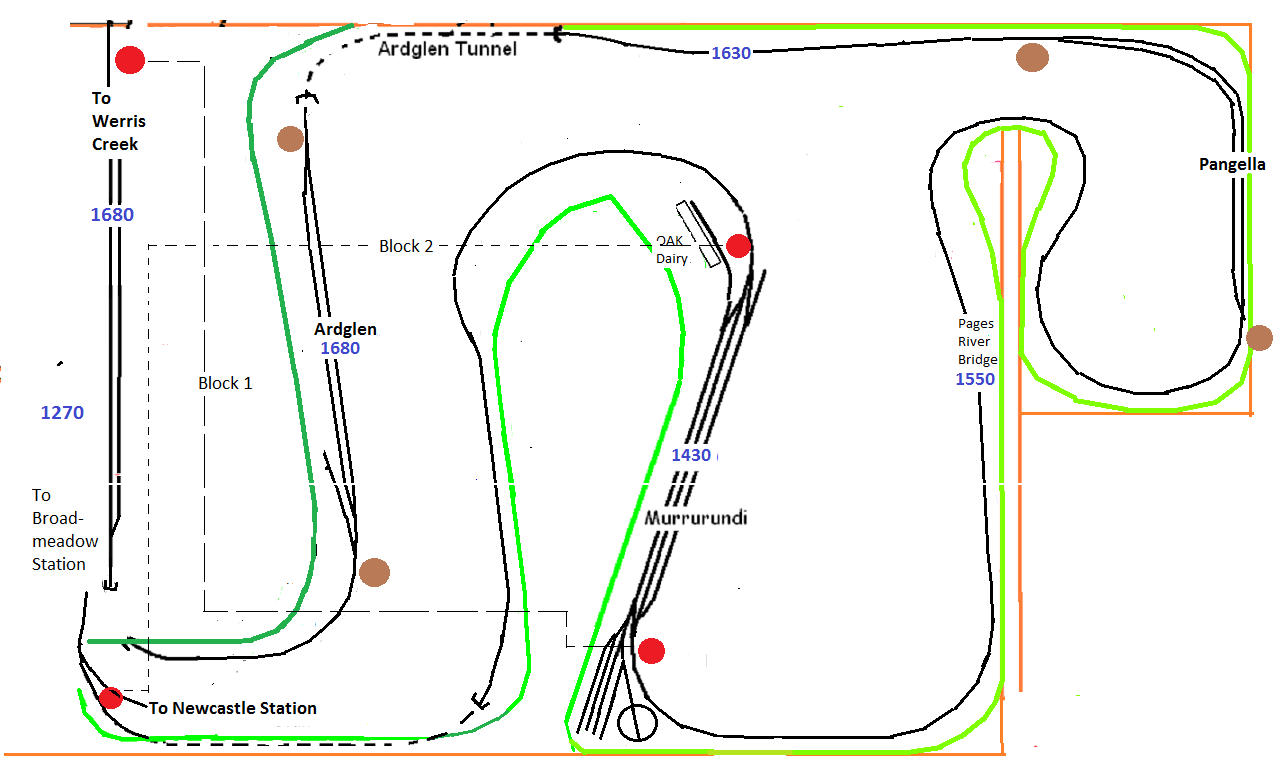
Now that there’s scenery on the Main North, there is more running of trains. There have been a few “cornfield meets” on the 40 metre (130 feet) single line, from Broadmeadow as it “winds up” to Werris Creek, due to the “physicals” of the layout with the 3 peninsulas restricting the operators view of what’s happening elsewhere on the layout, shown it the diagram below.

This section of track is crying out for some sort of “signalling”. Looking at the prototype and from the Signalling Clinics I have attended recently, I’ll need to add heaps of Semaphore Signals to each of the passing loops at Murrurundi, Pangela and Ardglen – lots of expense but mostly time to do this. In time it may get more prototypical but for now I’ll keep it simple to reduce the the “cornfield meets”. You’ll always have someone run against a red light.


I have added two “blocks” to this 40 metre section of track. Block 1 – Werris Creek to Murrurundi and Block 2 – Murrurundi to Broadmeadow. The Yard at Murrurundi is not included for “my” occupancy detection as this makes the “job’ much harder, much more expensive and possibly with the chance of it never being completed.

For the time being, I’m using CDA Colour Light Signals (Part No 131) and NCE BD20 Occupancy Detectors. Two detectors are necessary for my basic Signalling.

Two signals are located at either end of Murrurundi Yard and one at the southern end of Werris Creek Yard and the fourth at the northern end of Broadmeadow, shown as red dots on the above diagram. When Pangela is completed and I have made 8 Semaphore Lower Quadrant signals and associated parts, I’ll replace the Colour Light signals and install Semaphores at Ardglen and Pangela (brown dots). The Colour Light signals will be used in Gosford. 

For the Werris Creek to Murrurundi block,(block1), as soon as a UP train leaves Werris Creek or a DOWN train leaves Murrurundi, both signals for that block turn RED, indicating to other operators not to leave Werris Creek or Murrurundi. Power is not removed for obvious reasons, just the signal goes red. The same for the second block. With the UP train arriving at Murrurundi, to make it simple, the operator will determine visually which road to use and select the appropriate Points. The 3 roads should never be full but I guess it will happen.

The Occupancy Detector comprises of NCE BD20 that energises a Relay when there is "occupancy" (current gong to that block). A 1.0 Amp Bridge Rectifier with a 220 uF Capacitor connected to the DCC track, provides the necessary 12.0 Volts DC for the detector and the signal LEDs. It is as simple as that. The Relay “switches over” the “negative” for both Signal LEDs with the two signals wired in “parallel”. The two 1,000 Ohm resistors attached to the Relay. The Detectors are located at Werris Creek for block 1 and Murrurundi for block 2. Telephone cable is used to wire up the second Signal. Shown below is my detector.


This “basic” easy to construct and install, Occupancy Detector works great – no more operators yelling is “anyone coming down from Werris Creek” etc. I wonder how long this form of signalling will be on the Main North. At the moment, no resistor wheel sets are installed, just the loco "tripping" the sensor. I may fit resistors to the Guards Vans. 

The scene below shows the Murrurundi “northern” Signal at Stop, “keeping” the rear end banked Down Mixed Goods, in the Yard until the Up mixed Goods arrives at Murrurundi Yard. I have temporally added a back scene to Murrurundi for evaluation.


Now to build those Lower Quadrant Signals, purchase Mini Servos and Servo drivers etc but for the time being I'm really happy with my easy "Signalling" of this section of the Main North.

Monday, July 14, 2014

Main North Video.


5 Feb 2018 Update: 1880 have viewed my July 2014 video. A lot has changed in 3 1/2 years, see my Feb 2018 video below.


If you want to see the progress in those 3 1/2 years, see the 2014 video below.


Wednesday, July 2, 2014

Learning how to do Scenery on the Main North. It beats doing DCC installs.


Yesterday I posted my first Blog entry in 3 years indicating there have been major changes in my life – retirement, home renovations and most importantly, changes on the Main North. If the activity on this Blog is any indication, many of you here following, thought nothing would happen, well it has and it’s also surprised me.

The renovations have been completed so I have the rest of my life to finish off the painting, landscaping and getting my new “garage/shed” in order, for the moment I’m into trains 24/7, playing, planning and working on my layout. The plywood junction is slowly being replaced with scenery.

Initially I was helped by my mate Brian from Townsville, colloquially known as the “Northern Terrorist” with the scenery on the Murrurundi to Pangela line above Gosford. After Brian returned home, I had to keep the ball rolling, with 3 more sections done. The newly sceniced areas still need the fine detail like ballast, fences, Telegraph Poles, station detail etc. to be added.

With track plan of Gosford completed, I thought I’d better attack the section of track above Gosford prior to installing the “overhead” to minimize damage to the Gosford’s overhead. While planning the scenery prior to Brian’s week at the Main North, I phoned Brian as he lived at Murrurundi in the 70s, I asked if he had a photo of the bridge over the Pages River - no was the answer but he said he’d see what he could do and that was 9.00 pm. At 10.00 am the next morning there were some photos of an NR crossing the Pages River Bridge. Brian’s brother went out and photographed it at sparrows fart.


Now I had to model the bridge. Thanks Kevin and Brian. Using my scaling method and Google Maps, I worked out the bridge should be about 100 scale feet long.
My nearly completed Pages River bridge.. 


The total mainline length of the Double Deck Main North is now 115 metres excluding the two Return Loops at Sydney and Gunnedah, so scenicing the Main North will certainly take some time but a start has been made. I have been surprised with the efforts. Wow what a difference scenery makes, when playing trains on the sceniced Main North. I wish I had started with the scenery, much earlier.

Upper Deck - Murrurundi to Pangela track looking towards Murrurundi with with the Pages River Bridge.

Lower Deck - Gosford looking south with the not yet built station platforms (Platform 1 behind the HUB Cars and Platform 2 and  the grey platform, the Loco (with Turntable) and the Electric and Car Sidings for the 46 Class Electrics and the Interurbans, respectively


Looking back towards Pangela that's located in the "reclaimed space",deep under the house.  


Running further north towards Werris Creek, heading towards the eastern portal of the Ardglen Tunnel. The Tunnel is only a metre long but goes through a right angle, into Ardglen Station.
A small part of Fassifern is shown in the lower L/H corner. 


Exiting the western portal of the Ardglen Tunnel. The future Ardglen Ballast Quarry will be behind the sandstone above the loco/tender. 


Ardglen. Brian made the Station about a year ago, so a better home is long overdue.
Under the two houses on the Hill and behind the large tree in the foreground is the track to the Ardglen Ballast Quarry.
The "white" Newstan Mine Bin can be just seen in the lower L/H corner. and shown below.


Top Deck - Ardglen
Lower Deck - Newstan Mine with 22 loaded BCHs under the Bin ready for the trip to Port Waratah. A second Garratt will light engine from Broadmeadow, shunts the Van onto the BCHs then couples up to the first Garratt. The coupled Garratts push the train on to the mainline. With the complete train on the Down Main the Double Garratts attack the 1 in 40 grade up Fassifern Bank. Using QSI's Heavy Load feature, in these Eureka Models Garratts, this makes a truly magnificent train operation, just like what happened in the late 60s. At Broadmeadow, the Garrattts are "run around" the train then separated. One Garratt is placed in the Yard and serviced while the other Garratt pulls the train into Port Waratah (the Back of Broadmeadow). There is no room for full BCHs so the train continues on via a Sneak Path under Sulphide Junction and back to Newstan Mine with the Garratt and the BCHs re-positioned under the Bin. This takes the operator about 45 - 60 minutes to do.


Fassifern showing the Wakefield Road overbridge.
The Newstan Mine track veers off to the right just beyond the bridge.
I need to paint the house in the foreground, white as this house is very clearly shown in many of the Fassifern photos I have seen.


An overall view of the some of the layout with

R/H lower - North Gosford with the Garratt Sidings and the Up Refuge (22 inch radius) on a curve with the change from steam to a 46 in progress.  
R/H upper - North of Pages River Bridge.
Rear Lower - Fassifern and my "home grown" Sedum Gum Trees. A future topic on the Blog.
Rear Upper - south of and up to (going north), Ardglen Tunnel.


Most trains on the Main North in the mid 60s were steam hauled. Werris Creek bound (Down) trains were assisted over the Range with a "rear end" banker connected to the train at Murrurundi. A second operator is necessary to run the Banker. Two operators working in tandem over this 25 metre section of newly sceniced track with two sound equipped Standard Goods etc, wow what fun.
To make this operation easier and overall running of locos, I "speed match" ALL of my locos to a maximum speed of 30 MPH. Using 28 Speed Step mode, the Procab's Speed display indicates the approximate MPHs of the locos. This makes "banking" a little easier with both loco's s displaying the same an approximate MPH reading.
For extra reading see my previous 30 MPH max speed matching entry in my Blog.

The Grass is made using 6.0 mm long Static Grass from MiniNatur and applied to the layout with a "home made" Grassinator from an article by Ray Pilgrim using a $14 Negative Ion Generator from Oatley Electronics here in Sydney and PVC plumbing parts. A future Blog Topic. Contact me if you want the Grassinator article. 

I have been busy on the layout for the last couple of months. Much more to do but doing scenery is lots of fun and with the results, very rewarding.


Tuesday, July 1, 2014

What's been happening on the Main North since 2011.

I’ve been embarrassed into posting what's happened to the Main North, since October 2011 – not much, until the end of 2013.

I’m now retired. I took redundancy from Qantas in April 2012. With 7 days a week “off”, I cannot get as much done as compared to when I worked. Many retired modellers have said the same.

Mid 2012, I completed my first bit of scenery, the southern entrance to the Tickhole Tunnel, north of Sulphide Junction, complete with my “very small part” of the Cardiff Locomotive Works. Still not painted (July2014) but at least it’s somewhere to deliver goods to.


At the other end of Sulphide Junction is my yet to be painted Sulphide Smelter Works, the final destination for the W44 Concentrate Train. On arrival of the W44 at Sulphide Junction, the load is shunted into the Exchange Sidings by the C35 and an AD60 then the locos are “light engine” to Broadmeadow. The operator then returns to Sulphide Junction where he shunts the wagons into the appropriate Sidings using the “Sulphide Shunter” – a Bachmann 44 Tonner with Soundtraxx Tsunami Micro sound. My first loco paint job with decals from the U.S. Now painting was big deal for me. So I think it turned out okay.


The Sulphide Smelter Works are made up from 3 Cornerstone kits, the Glacier Gravel Works, Power Station and part of a New River Mine kit.


While painting the Sulphide Shunter, I thought I’d paint my Lloyd's C30 Tank that I’d built about 15 years ago. Fitted with a Soundtraxx Micro Tsunami, MRC Speaker & a TCS KA2 Keep Alive. To fit the KA2 under the Coal Bunker, I had to “cut” in two. 


Previously the C30 stopped/stalled on the Double Slip at Fassifern and many of the Points on the layout. The Keep Alive supplies about 5 seconds of power, enough to negotiate the Dead Frogs as I make my Peco Electrofrog Points more DCC friendly. I’m too lazy to add switches/Point motors, resulting in 40 mm of dead track. My Garrats, C35s, C38s, 50s and most of my “all wheel pick up” Diesels negotiate these so I thought it easier to fit a KA2 to the C30 instead of adding switches, wiring etc.

For those that don't know what a C30 looks like, this is it with a Tsunami Micro under the Smokestack, a MRC 20 mm with the housing's back, trimmed off and glue to the Cab Roof and the cut in two KA2 under the Coal Load.  


I also started with my Newstan Mine along with the Loading Bin. Ballasting the mine roads were my first attempt at ballasting. At the same time I made my Fassifern Bank as shown.


That was it for 2012.

Just after Easter 2013, we, well my builder Son Matt, started renovating the home of the Main North, working 7 days a week for 5 months with a few breaks to see his Girlfriend in Melbourne. Along with the normal "non train" renovations that the Boss (Elley) deserved (new kitchen, bathroom, family room, deck etc.), we added a double car Carport with a new driveway and a large shed. Elley says she had to "make" a Builder to get anything done around the House. Well we know that’s not true, I’ve been building a model train “empire”.

In September 2013, Matt said he had done enough and moved to Melbourne, so "finishing off", is up to me. A phone call discussing the lack of progress around the house, Elley said to Matt "You should see what Dad has done in the Garage, he's built over the work bench and added more tracks instead of doing scenery. To top it off, he's put a work bench outside in the Carport." Matt's reply was "You've let him get away with it for years". Some mate that Son of mine, is.

With Matt gone, my thoughts were about trains again and not the house. I “resumed” a 2.0 x 3.5 metre section of the area under the house adjacent to where Gosford is to be located, used for storing junk etc. to be a part of the Gosford “build”. I also moved Matt’s junk from under the layout to another area under the house. This allowed me to add 10.0 m of track between Gosford and Fassifern on the lower deck, eliminating the rear of the Double Garratt Newstan Mine Coal train from entering Gosford as it was shunted onto the mainline at Fassifern – most un-prototypical shunting and on the upper deck 10m of track between Pangela and Ardglen.

The work bench area plus across the “duck under” entry into the other storage area, provides a severely compressed 5.0 m Gosford with and the Electric sidings on the “bend”, Gosford Station and Loco with a 75’ Turntable at the southern end and the steam engine storage sidings including Garratt sidings, at the northern end on a curve into the newly acquired above area. This “peninsular” allows for UP Goods trains to enter the UP Refuge around behind Gosford Yard. The length of both Refuge Loops, allow for the “engine change” that was necessary at Gosford in the 60s for trains up to 3.5 m long, shown below with the the latest scenery above Gosford of the Pages River Bridge and the track from Murrurundi to Pangella.


A week long surprise visit in December by Matt to finish off some projects culminated in a major improvement for the Main North, replacing the solid metal Garage Door with a Stud Wall and a Sliding 800 mm Door. My Main North was going to “sealed” from the elements, at last.

To finish off the now called “Hobby Room” on the Plans, is to get all the “workshop” tools, equipment, drawers etc. out into the new Workshop in the 8 x 5m Pergola without security. For the time being, the valuable tools and equipment are kept in the Hobby Room. Dec 2014 saw walls and two second hand Roller Doors fitted the Pergola. It's now the SHED. 

For 2014, I need to add the second main line out of Gosford and up the Cowan Bank complete with Overhead Wiring, hopefully done prior to the delivery of the Auscision 46 where I’ll need a few for the “change of Engine” at Gosford with 46s to and from Sydney, on most trains.

The SCRMA has just had April 2014 Epping Seminar on Bridges and Culverts. On preparing for my Clinic for the day, I have been motivated to add a 2.1 m Hawkesbury River Bridge to the Main North opposite Gosford, but that along with other Main North additions, they’ll be in the next blog entry, hopefully in a few days.