https://web.archive.org/web/20220311020340/http://www.members.optusnet.com.au/nswmn/

https://web.archive.org/web/20220311020340/http://www.members.optusnet.com.au/nswmn/
Above photo is my Gosford complete with the Overhead. Click on the photo to see the Main North Album at Flickr

Monday, October 24, 2022

My Web Site has GONE - Bummer!!!!!. but pages are still available - see below

UPDATE: Click here for the Wayback Machine link. & go to the page you'd like to view & the web.archive url will be displayed. 

Using the example of a C32 decoder install, the displayed address, the url will be shown:

web.archive.org/web/20210609004259/http://www.members.optusnet.com.au/nswmn/32.htm

Place your Cursor at the start of the url & LEFT Click. 

A new url, beginning with "https://" will display shown below:

https://web.archive.org/web/20210609004259/http://www.members.optusnet.com.au/nswmn/32.htm

REMOVE the text after the "https://", shown in RED text above. including the "." after "www"

The new url will be shown and my original page is shown complete with photos that were missing on the Wayback Machine pages.


On Sunday 23rd October 2022, I clicked onto my Desktop Icon for my Web site. Instead of seeing the photo of the fantastic Garratt, I got this message:

Invalid URL

The requested URL "http://%5bNo%20Host%5d/nswmn/index.htm", is invalid.

Reference #9.159c3e17.1666644809.1b6ee226

THANKS Optus

With the help from Martin with his comment below and a Web Archive link of:

https://web.archive.org/web/20220311020340/http://www.members.optusnet.com.au/nswmn/


Martin you're the Man, this helps a lot, THANKS Martin.

How long can the "archive" site work? 

So for now when "googling" me to find my web site, searchers will find my Blog and see this link.

I will ring Optus to see if they can fix it.

Without having rung Optus my provider, I found that all urls NOW have to have an "S" in the first few letters of the url. (https://). Some of my computer geek mates told me this "s" thingo was around for years. Optus may have a quick fix but......

Back when I had to switch over to the NBN, I contemplated changing to another Provider but decided to keep with Optus due to I wanted to keep my web site, so I stayed with Optus. 

So now I have decide what to do with my web site.

I had a Counter on my Home page. Feb2018 showed I had 13,000 Visitor since I added the Counter. That panned out to approximately 300 Visitor per month. This determined that I should keep my web page going. Today it shows 23,000, so for 54 months 10,000 Visitors. That's now 187/month. 

I have purchased a Domain name but I'm having reservations about using it.

My mate Randall suggested I could add my popular web pages to my Blog. Topics like my Stay Alive & DCC Novices etc could be added to my Blog. I cannot comprehend editing my DCC for Novices Book, there was lots of good information there. Just yesterday I had reason to show another mate some tips on installing Decoder Pro. 

I'm not up to doing this at the moment but will I ever be up to it.

I'll ask you guys who read my Blog, what "pages" I should add to my Blog & for possible suggestions of what to do, while I ponder on whether I do anything. If any of you need a particular page, I can email you what I have in my Documents Folder & applicable photos etc.

Please let me know with a Comment here.


Wednesday, October 5, 2022

Bringing back the Wheat Terminal in Port Waratah.


Years ago I upgraded my Port Waratah to better handle my Newstan Coal trains that were operated regularly during my Operating Sessions by replacing the Wheat Terminal with the Newstan Coal Loader.

Adding the 48s to Werris Creek, I introduced the running of a 1,000 ton Wheat train from Werris Creek to Port Waratah comprising of 16 BWHs & Van hauled by double 48s to Willow Tree where the train needed to be rear end banked up the 1 in 40 grade to Ardglen by another 48 (in my case 4801), using a second Operator.  I did a YouTube video of operating this train through to Ardglen. The train Operator ran on to Port Waratah, click here to see the video

Arriving in Port Waratah the Wheat train had nowhere to be stored & blocked up the mainline track through Port Waratah while the Operator shunted the Van around & left the double 48s on the Newstan Sneak Path, inconveniencing the Operators of the Newstan Coal trains.  

I fixed this dilemma by repositioning the Coal Loader Sidings towards the backdrop a little, reducing the length of one of Empty Newstan BCH Sidings & extending the Siding allocated to the Vans, to now accommodate the BWH Wheat train to the doorway into the Crew Room. 

I added a 1.0 metre "lift up" section of track, stored under Port Waratah that when required for the Wheat train, is swung up, extending into the Crew Room.

This addition made this new Siding 2.7 metres long, just long enough to keep the Wheat train including the double 48s, out of the way of other trains running through Port Waratah. This was just a test set up that's now good enough to be in place permanently.

I re-installed the Walthers Concrete Silo Kit to the end of the shelf with the Unloading Shed hard up against the fascia. This kit is not very prototypical for us NSW modellers but better than having a pretend Wheat Terminal.

I made cutouts in the Silo so as it would fit over the 2 Newstan BCH Empty Sidings for the Empty Coal train (22 BCHs). I still have to replace my cardboard box Newstan Coal Loader. 

The Port Waratah trackage tapers down to provide the widest entry point at the doorway as shown below.

I laid a piece of track over the angled hinge point, temporarily securing it with track pins then cut the track with the Dremal, to test the hinge/track setup.

I added track  to the end of the lift up section.

To my amazement, the 48s & BWHs negotiated the hinge cut, without any  derailing, so this temporary setup is now permanent.

I added 3 pieces of 3 mm MDF for sides & the End of the "lift up" section. 

I added a Peco In Track Magnet allowing for easy remote uncoupling of the wagons when the 48s are hard up against the MDF End Stop.


The Operator runs the Wheat train into the new siding until the 48s hit the End Stop, that positions the appropriate couplers over the Magnet, ready for disconnecting the BWHs from the 48s for the return Empty Wheat to Werris Creek. 
 

This is the Operators view of the Wheat Terminal from inside the layout, with the two Main North Bridges, down. 
 

While the Operator shunts the Van into a Siding with 4803, the 16 BWHs are mysteriously unloaded & the Wheat train is ready to be run back to Werris Creek by the same Operator or someone else during the Session, maybe.

The empty Wheat train now weighs less than 400 tons so a single 48 is all that's necessary for 1 in 40 grades to Ardglen, leaving the double 48s at the end of the "Lift Up" track. Note: My Trainorama 48s cannot haul the Empty train up my Ardglen Bank while my latest Powerline 4803 can. Hence the necessity of having 4803 parked in Port Waratah, prior to running the Wheat train.

Retiring for a Cuppa etc, I open both the Main North Lift Up Bridges to their stowed UP position so it's an easier exit for all Operators, to the Crew Room. 

If the Wheat Train Lift Up track is UP & the Empty Wheat train is still there, I'll pull it off the Lift Up Track with 4803 & place the 2 48s by hand, into the Werris Creek Diesel Terminal. With nothing on the Lift Up Track, then I'll stow it back under Port Waratah. 

Thursday, September 8, 2022

Improving Sydney Staging Route Indication.

With my previous Control Panels, the appropriate road/route is indicated by illuminating the Green LEDs using one pole of a 2PDT (2 Pole Double Throw) or 4PDT Toggle Switches but as I'm substituting the Toggle Switches with a Diode Matrix for Sydney Staging, I have to use something else. In this case I'm using Microswitches that are operated by the Point's Throw Bar, after experiencing intermittent operation of Point motors, piggybacking a Peco Accessory Switches.

To indicate "occupancy" of the hard to see Loop/Road for an Operator entering Sydney Staging, I made 5 Occupancy Detectors on a piece of Veroboard, shown below. Occupancy is detected by passing the applicable Track Feeder through the Doughnut transformer 3 times, similar to what I did for the Armidale Control Panel.


With Armidale Staging, I used Bi Colour Red/Green LEDs for the LAST LED, connected to the two pink wires at the left, for each of the tracks on my Control Panel, indicating that the Road/Track is "Full" (occupied), by illuminating the Red LED.


I don't want a lot of LEDs illuminating on my Control Panel - only the appropriate ones for the selected route. Using the above method, the Operator had to press the Track Push Button or in my Armidale Staging, operate the Toggle Switch, to find the occupied roads. 

After installing Point Motors, a Diode Matrix, Capacitor Discharge units & a Control Panel for Sydney Staging route control, I had a visit from Erik & Randall where I demoed my efforts.

Erik suggested that it would be better if the track "occupied" Red LED was illuminated all the time. This would make it easier for the Operator to see which route/road they'd have to set, just press a Switch for any track, not in the "Red".

This new concept needed a lot of thinking how to do this. As the Occupancy Detectors only get 12 Volts when the track is selected from the combination of the Microswitches, shown below. 


How would I do it?

How could I provide 12 volts to the track indication circuitry that was not selected due to the Microswitch action removing power to the circuit. Initially I added a small Relay as I have with my Occupancy Detectors for my Signaling Detectors where the Relay is energized when the appropriate track is "occupied", supplying 12 Volts that would keep power to the Detector, shown in the below schematic. Selecting another track, the previous track if occupied, kept the Red LED illuminated.


It worked only when each push Button was pressed - Bugger.

Having very basic skill in electronics, I needed to solve this with "something" basic.

I added another Relay with a 470 uF Capacitor in series with the Coil, shown in the above schematic on the L/H bottom corner. On power up, this relay supplies 12 Volts to ALL 5 Track Detectors for a 1/4 of a second, long enough time for any of  the Detectors that sensed occupancy energizing it's own small Relay that supplied 12 Volts to "itself". This resulted in Red LEDs illuminating for ALL the occupied tracks with only the "selected" Track's Green LED, illuminated. 

It works.

Shown below with the appropriate LEDs illuminated with Track 1 selected.


Shown below with Track 5 selected.


The overall view with Werris Creek (top) & Sydney Staging (bottom) with the LEDs illuminated showing the route an Operator has selected (Track 1) & Tracks 3 & 4 are "occupied", to run through Sydney Staging, a common running of trains on the Main North as their Operator runs back to where they came from. 


I've finally added a second Control Panel to Sydney Staging, connected "in parallel" to the Main Panel that allows Operators to "start" their "staged" train, without going to Main Panel. I added a Crossover that's used only for the Northern Tablelands Express & now for returning the 46 Bankers to Hawkesbury River Station Siding.
With some help from Andrew, I fixed the Occupancy Red/Green LEDs circuitry. 


Time will tell how my circuit "logic" survives.
 
This project started 6 weeks ago where I spent heaps of time making this work & it has been fun. 


Sunday, August 21, 2022

Newcastle to Fassifern Layout.

Recently I attended an Operating Session on Garry Glazebrook's Newcastle to Fassifern layout. I've been very lucky to have visited/operated Garry's layouts many times, including at his two previous locations of Lewisham & Mittagong.

Garry did a Presentation on his Lewisham layout at the Modelling of the NSWGR Convention way back in about 2006 at Petersham, that I attended. After the Presentation I suggested he should convert it to DCC. We became model railway Mates & I got him going in the conversion by connecting an NCE Power Cab & added decoders to his locos. At the above Operating Session one of his Alco 44s let the smoke out. On removing the Top, I found it was one of my early installations. I hope he doesn't try & make a warranty claim.

Garry has done more Presentations on his layout. Garry's day job as a Transport Consultant, he did Presentations using those old fashioned Transparencies. He made Transparencies of my first Presentation I did for the Modelling the Railways of NSWGR Convention I did the next year as he didn't trust this new stuff. I should look up all the above details but there is only so much time left.       

Garry had a very comprehensive web site describing his research & progress of building his empire but it has long disappeared. Click on the following link for a Presentation that Garry did for the NMRA available at their web site at:

https://nmra.org.au/newcastle-to-fassifern-railway/

I haven't been to Garry's layout for a while & I'm amazed at the progress he has made. His Steel Works & Port Waratah Coal loading facilities are sensational not to mention his astronomical amount of Paperwork supporting his Operations as shown in the above NMRA Presentation, I cannot get to Garry's as often as I'd like to, due to issues at home but hopefully this will change in the future. Today I took lots of photos, some shown below. Click on the last photo for the YouTube tour of Garry's wonderful layout.  

First a 2017 Track Plan of the layout.


Both of Broadmeadow's Roundhouses with working Turntables - fantastic. 


I spoke to Garry about how they converted Coal into Coke that I need to do as explained in my recent Sydney Staging Blog entry. It is done at the Steel Works in their Coke Ovens. I don't have the room or the skills to add one of these Coke Ovens.


Garry's Newstan Mine that I'm also modelling on my Main North layout, squeezed in between the 'Bank & the Backdrop.


The Burwood Colliery with lots of Sedum Autumn Joy trees on the hill above, viewed from outside Sulphide Junction. 


Port Waratah's Coal Roads at the right & the Steel Works Rolling Mill at the left. Refer to the Track Plan below. 


A Track Plan for the above photo with numbers for each of the Tracks to help you navigate the Sidings in Port Waratah during your assigned Train Order.


What an amazing diorama that Brian is finding out as he runs one of the Steel Work's trains.


The intricate electronics for the Semaphore on DOWN side of Kotara Station assembled by Roger with photo detector sensing the  train for occupancy detection. I'm in good company with my Occupancy detection looking a lot like Roger's. Not normally on display but you can see there's a hell of a lot of electronics & work to make those Semaphore Arms move.


Another shot of the Steel Mills.


One of Garry's scratchbuilt Sixty Milers moored at the wharf at Newcastle Station, waiting to be loaded at Port Waratah's Carrington Dyke. 


The trackage at Newcastle Station with the adjacent storage sidings between the station & the waterfront.


Very detailed Slag Bin cars.


Keiran shunting some Private Colliery Coal Hoppers with the large letter signifying which mine the are attached to, eg. A = Abermain etc. 


Looking from Cockle Creek Station towards Sulphide Junction with the Burwood Colliery in the background. At the right are the Steel Works with the Northern Staging/Return Loop & Sidings under Port Waratah.


Another view of the Steel Works with very some Information Schematics under the Staging tracks. 


Looking towards Despatcher Garry at Woodford Junction from the Despatcher's Workbench outside the layout, providing an overall view of the layout across Port Waratah with Keiran in the foreground.


Stewart operating a train from Newcastle Station into Woodbury Junction.


Garry having a very serious chat with Laurie.


Cockle Creek Bridge with Northern Colliery to the left.


Another photo of the Steel Works with a large Plan of the Steel Works making it a "little" easier for Operators to shunt trains.


Click on the below picture to see the YouTube of Garry's Newcastle to Fassifern layout. 


See an On Board Camera run on YouTube of Garry's layout by Gerry Hopkins below:


:


Sunday, August 14, 2022

Diode Matrix & Routes in Sydney Staging.


I needed to "electrify" the Peco Points in Sydney Staging due to the difficulty of seeing which way a Point was set and to manually changing it, through the Cutout in the fascia at the R/H end of Sydney Staging made worse since adding two extra Sidings. I didn't want to use the DCC solution of Accessory Decoders & a Mini Panel. This was an expense that I didn't need. More so now that I'm a Pensioner not unless I get a cash handout from my Kids, that's very unlikely.

Some time ago my mate Erik suggested using a Diode Matrix where pressing one Button would set all the appropriate Points to give a route through that Loop, similar to how the NCE DCC solution does it with a Mini Panel. I was familiar with Diode Matrix as I used them before. 

Erik wrote an Article about Building a Diode Matrix & it was published in the NMRA Mainline magazine. Reading the recent Mainline online, I read Erik's Article that's available at: https://nmra.org.au/3d-flip-book/mainline-2022-issue-4/ starting on Page 20, I was reminded that I should use this method to to electrify my Sydney Staging Points.

On all of my Control Panels I use one pole of 3PDT Toggle Switch to energize the Peco Point Motor's solenoid, using a 2,200 mF Capacitor & 2 Diodes. The second pole to operate a Semaphore Signal & the third pole to illuminate Green LEDs on the route selected. Since there are no Semaphore Signals in Sydney Staging I could use the Diode Matrix solution as described by Erik. I have plenty of the Peco Accessory Switches that'll do for illuminating the Green LEDs for the appropriate route.

I got Erik to send me Word copy of his comprehensive Article with plenty of schematics (Truth Tables) and started building a Diode Matrix to "control" the Points in Sydney Staging. With Erik's permission I've included his Article at the bottom of this Blog Entry. Click on the pictures/schematics in the Article & they display full size on your screen.

Transposing my "Diodes & Links" according to Figure 8 in Erik's article, making sure the Diode's Cathode (Band end) is facing towards the Switch (Negative - ground) onto the Veroboard (available from Jaycar), electrifying Sydney Staging was started. 

Operating Peco Points requires the use of Capacitor Discharge Units as explained in Erik's article. I built my own CDUs per an article in a Talking Electronics magazine "Six BD679 Projects", using Veroboard again, using a BD681 transistor, 3 Diodes & 2,200 uF Electrolytic Capacitor. I also added a LED & resistor. My experience of operating Peco Points Motors, you may need a second/third Capacitor especially if you're using the Accessory Switches, that I intend to use to indicate the route through the Yard/Siding by illuminating Green LEDs, Cost per CDU about $3. 

A rough Track Plan below including the two extra Sidings indicated by "F" & "G" that initiated the "electrifying" of Sydney Staging using Erik's Diode Matrix. I used Numbers instead of Letters, signifying the Route Number. 


You'll have to read Erik's article to understand what the below 2 diagrams show/mean.


Lots of time spent here and I'm starting to think the DCC Solution could have been better spent but I persevered. Made a lot easier with the working conditions to my liking, working with good lighting  a (small fluro lead light hanging from the layout), at bench height on a comfortable chair. With the Workbench and Tools close by I was in "construction "heaven, even better with the Heater in close proximity keeping us warm (me & the Cat). My 22.0 Volt D.C Power Supply on the Heater.

I made soldering all the wires from the Pecos to the Diode Matrix, easier by screwing a bracket with a small top secured to the Wall. Secure the Veroboard with a screw. Now it's much easier to solder wires to the Header Pins.

Erik used two CDUs but I decided to make one CDU per Point, I did not want any issues. Making them all on the same piece of Veroboard was easy, I just copied what I did on the CDU above. The row of push button switches on the bottom of the Diode Matrix make it easy to configure the wiring for the correct orientation & are connected in parallel with the Control Panel Push Buttons. Shown, some CDUs are using 2 Capacitors with No 9 using 3, soldering the Capacitor onto the Copper Tracks (backside) of the Veroboard. 


Final location of components for this project are mounted to a piece of timber screwed to brick wall, That's hidden behind the layout's fascia & curtain. On the right are the 10 CDUs & the Diode Matrix. On the left are the On Guard Auto Reverser and two NCE EB1s, one with the Audio Announcement module with small Speaker in the white tube above the Auto Reverser.


 Adding two Sidings 

Running the 20 BCH Coal train to the Balmain Powerhouse from Port Waratah, terminated at Sydney Staging. This train needed to be "off stage" for the conversion of the Coal to Coke, for the run north to the Newcastle BHP Steel Works, I added a long Siding inside the Return Loop so as this "burn off" could happen. In real life a Coke train ran from the Metropolitan Colliery south of Sydney.  

I very roughly fitted some white timber short length of boards to the "inside" of the Sydney Staging Return Loop to make a long enough Siding to store the Coal/Coke Train. While at it, I added another smaller Siding to store another train. These two Sidings come off Loop 4 (the rearmost Loop) at the R/H end by adding two R/H Points with a radii of the Siding being 20 & 18 inches respectively. 


The Coal train stored away having it's "conversion" to Coke being done with one little issue, all Operators follow their train from Hawkesbury River Station up Cowan Bank and now totally disappears behind the Coke Train running on the Return Loop. Recently one Operator asked if I could add more illumination under Broadmeadow, I re-routed my LED strip, now it illuminates the train in the Siding and once again it is difficult to see the moving train. I assure the Operator the moving train will appear at the Cutout. 


Up till now the  Points for the 5 Loops were manually operated through a cutout in the fascia but these two extra Points could not be seen or even reached through this fascia Cutout. This Diode Matrix & CDUs, will make this much easier. A Control Panel will added to the below fascia at the L/H side, photo later.


Shunting each of the trains to the end of the Siding, resulted in both the 46s at the Cutout for easy identification of the loco number. Dial up the Number, press the appropriate Fascia Control Panel Button and the road is set for the run north through Staging, for each of the trains. One minor problem Road 5 needs to be clear. I think I'll have to make this the Through Line and re-allocate the Road/Loop 1 to  be a siding. Good for the Concentrate Train - we'll see what works okay for the Operators & they'll let me know what's best.


A Control Panel was made for Sydney Staging & mounted to the L/H side of the fascia Cutout. Pressing a Button energizes the appropriate Peco Point Motor Solenoid/s via the Diode Matrix & the Green LEDs illuminate the actual route/road. Shown pressing Button 6 to run the Coke train out its Siding, through Loop 5 in Staging & on the way to Port Waratah. A mini Relay is energized, extinguishing the Green LEDs for the Return Loop when using Siding 6 (Coke train) or Siding 7. 


Operation of Point 8 with a Peco Accessory Switch was intermittent even after adding a third Capacitor & replacing the wiring from the Diode Matrix to the solenoids with heavier gauge wire. Fitted a small Microswitch as shown below, Point 8 now works 100% of the time & that's after I removed the third Capacitor. I fitted these small Microswitches to all the Points in Sydney Staging. Note: I use the Microswitch to illuminate the appropriate Green LEDs to indicate the selected road/route through Sydney Staging. On all of my previous Control Panels, the illumination of the green LEDs is achieved by using one of the Poles of the Double/Triple Pole/Double Throw Switch. I haven't used any of the Peco Accessory Switches before. 

I've accumulated many Peco Point Motors & Accessory Switches dismantling a few layouts over the years due their owners moving into a Nursing Home or passing away. The Accessory Switches are piggybacked onto the Peco Point Motors, I thought I'd  try them in my Staging area. I had intermittent operation of the Point. I wonder if the original owner had issues. Shown below is Point 8 with the Microswitch.  


To provide the Operator with reliable trouble free running of his train to store or run through Sydney Staging via the Return Loop, he'll have to select one of the "empty" Loops on the Control Panel. The fascia & other parked train can prevent him from seeing whether the Loop is occupied.

As done in Armidale Staging I made some Occupancy Detectors shown below, to see if the Loop is empty.  


If a train is occupying a Loop, the loco draws current even when stationary. The Occupancy Detector will illuminate the bi-colour LED at the end of the Loop to RED, if occupied, as shown in the Panel photo. The Operator will have to select a Loop where this "end" bi-colour LED is green otherwise he'll have to see the Fat Controller.


This addition to the Main North has consumed me for two weeks but making Control Panels does this to you. An Operator may be asked to a operate a train stored in Sydney Staging, to save him the  long 4 metre walk to the other end, I add a Control Panel for him to easily see which point needs to be operated, to get going, finding the Address of the Loco on the applicable Operating Card.

Erik, thanks a lot for your Article and your help with this project. 

Copied below with Erik's permission is the original Diode Matrix Article.

Build a Diode Matrix

Simple steps for a system to change multiple points with one button press.

 Introduction

You have a yard or section of your layout with multiple points switched by twin coil point motors (such as Peco point motors).

You want to be able to have a switch panel with a diagram of the yard, and push-buttons on each route through the yard.

When you push a button, you want all the points along that route to change.

 The following steps describe how to design and build the diode matrix that will operate such a yard, and how to wire the whole system.  It uses the example of a three road yard off a mainline, but the principle applies to any route system.
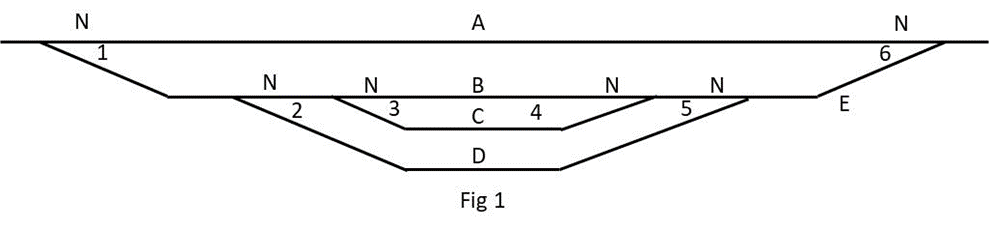
Diagram

Draw a stick diagram for your yard.  See example in Fig 1.

Number your points.  They can be any numbers.

Letter your routes.  They can be any letters.

Assign a Normal point alignment. (The opposite to Normal is Other).  It can be either alignment.
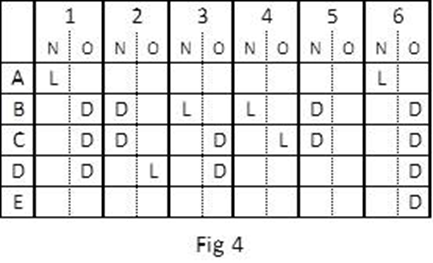
Route Truth Table

Draw a truth table for your routes. Using pencil and paper will do.  List your route codes and, for each, write in the points along the route and an N or an O to indicate their necessary alignment.


Note. Route E lets trains in or out of the yard while not needing to change point 1.

Matrix Step 1

Draw a matrix with route letters down the left and the point numbers across the top, indicating their Normal and Other alignments, as in Fig 3.

Use your truth table to fill in the matrix for each route by inserting the letter “L” (Link) in the N or O column for each point required to be aligned.

Matrix Step 2

Look in every N and O column.  Where an L appears more than once in a column, change every L in the column to a “D” (Diode).

This matrix now provides the logic for your route system. We need to add the other components.

 Capacitor Discharge Units

Capacitor Discharge Units (CDUs) ensure reliable firing of multiple points without burning out your push buttons. They are cheap and easy to build. You can buy them from model shops or build one for less than $5.


Some routes have many points to be switched and others only one or two.

In this example, routes B and C have six points and route E only one.  If you had a CDU capable of firing six points, its power would eventually destroy the single point in route E.

The solution is to use multiple CDUs.  Electrically, it doesn’t matter whether there are one or a dozen CDUs in the matrix system.

You use your matrix diagram to decide how many to use and which points to switch with each one. Try to keep to a maximum of three points per CDU.

In this example, two CDUs are used.

Completed Matrix Diagram

Fig 5 is a representation of the matrix, the point motor coils, the push buttons, the CDUs and the wiring to connect all components. The diagram forms a good template to work from when you are wiring up your system.

Where there is an L, you connect a piece of wire from the route button to the appropriate motor coil. Where there is a D, you connect a diode. The diodes isolate the route buttons from each other.

1N4001/4004 diodes are used. They are black with a white band at one end, the cathode end.  With the CDU output polarities as shown, the diodes must be connected with the banded ends towards the route buttons.      (CDU input wiring not shown for clarity).

Also, to make the diagram easier to physically match to your CDUs, you can move the point number columns back and forth across the page to line them up under the CDU operating them. In this example, it just happens that the numeric sequence nicely splits in two with a maximum three for each CDU.


Board Components

Use a piece of Veroboard to wire the matrix.

To make it neat, portable and to minimise soldering, use combinations of two and three interlocking PCB terminal mounts, available at Jaycar, to make terminal strips.

In this example, you will need one 5-terminal strip for the routes and two 6-terminal strips for the N and O motor coils. 


You will be positioning the components on the insulated side and inserting the terminal pins, diode and wire ends through the holes to solder on the copper side.

Two-Dimensional Magic

Hold the Veroboard with the copper tracks running left to right and study the diode matrix diagram and the copper tracks.  It is possible to wire the two dimensional matrix using only the horizontal tracks. 

Fig 7 represents the three terminal strips positioned on the insulated side, with their pins pushed through their holes. The horizontal lines represent the copper strips on the other side of the board.

Note that the O terminal block is positioned one track below the N terminal block. 1N, for example, is on a different track to 1O.

This arrangement, therefore, enables wires and/or diodes to be connected from a particular route track to any coil track, totally insulated from any other track.  Eg, a wire link from the track that the route A terminal is soldered to, to the track the 1N terminal is soldered to is a unique connection, touching no other track.  

You space the N and O terminal blocks depending on how many wires and diodes you need to fit in the space between.


Matrix Board Wiring

Fig 8 shows the layout of the matrix board for this example and the following connection instructions are for this example. Your board, of course, will depend on your diode matrix diagram – your equivalent of Fig 5 – but the procedure is the same.

Firstly, using Figs 5 and 8 as a guide, lay out the terminal strips, the wire links and the diodes on the insulated side of the Veroboard.  Arrange an optimal spacing and provide for possible future expansion of your yard.

You will probably find that the span for some diode connections is longer than the diode‘s lead length. With these, solder a length of wire to one end of affected diodes.

When you are happy with the layout, double check the locations then push the terminal strip pins through their holes, turn the board over and solder them.

Use a marker pen to write the terminal names on or near the terminals to help with accuracy when making the connections.

Using a wire link or diode, make your first connection.

In the example, insert a piece of wire, cut to length, into the holes along the tracks that route A and coil 1N are soldered to. Turn the board over and solder them.  Work your way through all connections, making sure to connect the banded end of the diodes to the route terminal tracks.

Double-check as you go.

When you have finished, your board should look like Fig 8.


Wiring the System

General

Peco point motors draw quite a lot of current.  To ensure reliable switching, you need to use good cabling and have your cable runs as short as possible. Use cable such as Jaycar WB1708, Heavy Duty Figure-8, which has a black trace on one of the pair.  To help with accuracy, use the black trace side to always connect to the N (Normal) side of the matrix board and point motors.

Locate your matrix board so it is central to the point system with cable runs about the same, and locate each CDU so it is central to the point motors it is serving.

Avoid soldering-in components to the circuit.  Use terminal strips such as Jaycar HM3194 12-way Terminal Strip. You make terminal blocks for the components by cutting the number of terminal pairs you need from the 12-way strip. 


You solder to the point motors and push buttons (and CDUs if they don’t have terminals) but screw-connect to the terminal blocks for interconnections.  This way, you can easily remove components for repair or maintenance without unsoldering anything. 

Point Motors

You wire the point motors before installing the point.

Pick one side of the point motor, either side, and solder individual leads to each of the two solder pads. The other side of the point motor is going to be the common, so strip the insulation from a lead, long enough to span both solder pads, and solder the lead to both pads.  It’s best to use a different coloured lead for the common. 
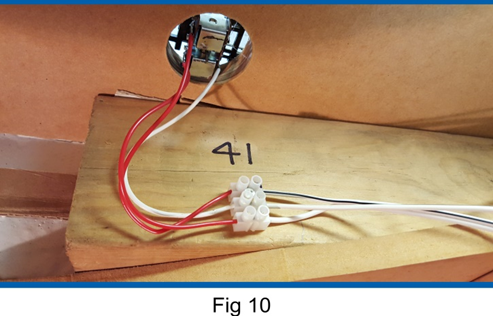
Push the leads through the hole in the baseboard and install the point. 

Cut a 3-terminal section from a terminal strip, and mount it close to the point.

Screw the common wire into the centre terminal of the terminal block and the other two into the end terminals, as in Fig 10.  Standardise on using the centre terminal for common.

Use a 12V source such as an old train controller to work out which coil produces the N alignment.  Manually align the point to the O alignment then, with one controller lead on the common terminal, tap one or the other active terminals to see which one causes the point to change to N.

When you have determined the N alignment, mark the terminal with a marker pen.

At this time, also write the point number on or near the terminal block. 

Using Fig 5 as a guide, run figure-8 cable from the outer terminals of the terminal block to the N and O terminals for this turnout on your matrix board.  For consistency, use the wire with the black trace to connect terminal block Ns to the N terminals on the matrix board. 

Complete the point motor wiring by running single wires from the centre terminal of all point motor terminal blocks to the positive terminal of the CDU serving them. If the CDU does not have on-board screw terminals, connect its outputs to a terminal strip marked positive and negative, and wire your point motors to the terminal strip positive. 

Interconnections

Design and build your push button panel.  (Doing this is outside the scope of this article.) 

Position two terminal blocks close to the panel, one for the routes with a segment for each route and one for a common. Label the route terminal block with the route codes.

Solder leads to the push buttons and connect one side of each push button to its position on the panel route terminal block. 

Connect the other side of each push button to the panel common terminal strip.  If necessary, make a  multi-segment common terminal strip by connecting wire joiners between the terminal positions. 

Refer to Fig 5 for guidance. Run single wires from each position on the panel route terminal block to the appropriate position on the matrix board route terminal block. 

Run a single wire from the panel common terminal block to the negative terminals of the CDUs. 

Final Testing

That completes the wiring for the system. 

If you have checked everything as you go and are guided by Fig 5, it will work first time.


However, the following may happen:

It works but some routes are not right. 

Check  the truth table logic to verify that a route should work. Check whether the point terminal blocks are correctly labelled N. Check that the diodes are connected the right way around. Check the polarity of the CDUs relative to the way the diodes are wired.

It works but some points in a route don’t switch reliably.

Try adjusting the little slider near the throw-bar of the point. Sliding it back makes the point easier to switch.  If this doesn’t help, add more capacitance to the CDU or increase its voltage supply.  This topic is covered in a separate document. Simple CDU circuits can be found on the Internet.

When you have it all working correctly, give yourself a pat on the back and run some trains through the yard.

Erik Bennett 26/07/2021