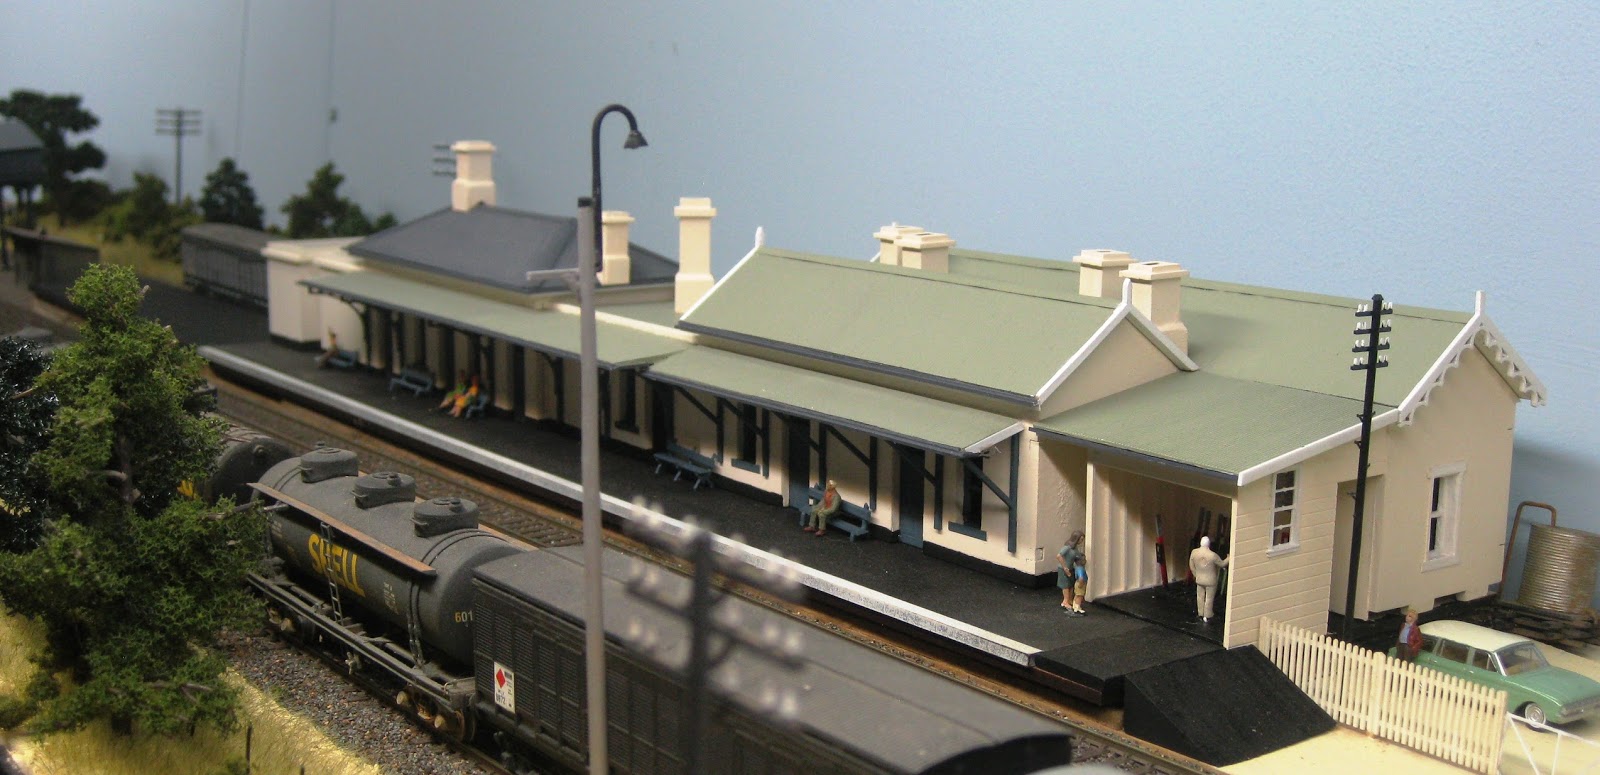
Above is my Gosford complete with the Overhead. Click on the photo to see the Main North Album at Flickr

Monday, May 25, 2020

Upgrading Newstan Mine.

Suggested in my previous Blog entry, where I did some videos for the 2020 Epping Seminar of coal trains operating on my layout "around" my very basic Newstan Mine (shown below), I really needed to upgrade the mine NOW, now that I'm getting better at doing scenery.


Using photos I have collected over the years especially for the overall layout of Newstan, a 1972 view below, I've got a much better Newstan, now. More detail to be added like completing the buildings, painting etc but there's so much to do on the Main North, this will do for now.


I visited and photographed Newstan Mine in 2005, a lot different than I what I wanted to model for my mid 60s Newstan - no over the track Loading Bins that are the "centre piece" of my Newstan.
I also visited the Lake Macquarie Library to make a copy of Brian Andrews "100 years of Northumberland/Newstan 1887 to 1987", book. Some great photos and details for my mid 60s Newstan.

My 2.0 metre long wedge shaped Newstan Mine is 350 mm wide at the "head" end, tapering down to 100 mm wide at the "throat", is jammed in between the back scene and Fassfern Bank.
The end of the Mine is hard up against the Hill for the deep Cutting at the top of Fassifern Bank, as the track goes around the peninsular, into Sulphide Junction. The high "Run of the Mine" Bin fits in against the Hill, in any event the that's the way it has to be.

I made a "close enough" Coal Preparation Plant where the coal is washed prior to being loaded into the over track Loading Bins, from leftover parts from my Walthers New Riving Mining kits.

I also purchased a Walthers Walton and Sons Lumber kit to make the Workshop. On fitting it into the available space, I should have scratch built the Workshop as I had to cut it in half.

Coal for my Newstan Mine, comes from behind the Mine and at the top of the Hill via a Conveyor, into the large "Run of the Mine" Bin.
From the bottom of the Bin with another conveyor into the top of the Coal Preparation Plant, then by conveyor into the over track Loading Bins.

This pushed the Preparation Plant further to the right toward the Mine's "throat".
I needed to add the Winder and the Workshop to this shrinking space. Something had to give.
I could not include the Office Block/Miners Facilities as per the "real" Newstan, it's all about compromises.


Installing the coal delivery conveyor to the large Bin, the hill was too high.
I had to trim the existing hill, that's easy to do with foam for the scenery base.
Added to the scenery by "planting" more trees. I also added a little more "hill/landscape" to hide the entrance to Shunting Neck.

This made operating the furthest Point, that's inside the tunnel impossible to operate by hand that has been okay for years.
I was going to take the easy option and fit fascia mounted "recessed" knobs but Operators may not have noticed the "hidden" Point.

I needed to add a Control Panel where Operators could see the track plan at the Loading Bin area of the mine area.
Due to the narrowness of the aisle here, for the Operator to easily see the route and operate the Points, the Control Panel needed to be at eye level, I mounted it in the fascia for the Upper Deck (below).


It was "recessed" so as the toggle switches would not be fouled by Operators, extra work but worth it. Note: Green LEDs ONLY illuminate for the selected route.

Over the years I've accumulated lots of Peco Point motors.
I fitted a couple of the side mounted units, making "motorizing" the points, easy, without removing the Point or drilling any holes etc.

I added a Shed for the conveyor mechanisms etc, to the Loading Bins and had to swap around the Loading "funnels" as the the "Through Road" now is the track closest to the aisle.
Sprayed the Bin with grey primer. I had to get rid of the "white" colour. I have to add the Conveyor mechanisms to the top of the Bin, later, so the grey Bin will do for now.
Fitted some of Anton's Yard Lights (not illuminated), to the Mine tracks.


Ballasting the track around the 3 Points using some of Geoff S's Weber BBQ ash, was the final part of the Newstan Upgrade. I also ballasted the main line up Fassifern Bank and Fassifern Station, using Chuck's Ballast H.O. Martins Creek ballast.

I have lots more ballasting to do on the Main North. Seeing how far a 1.0 kilo bag of ballast goes, I was worried that the 9 kilos I still had left would not be enough to  finish the layout. I was lucky to purchase 10 more kilos of Chuck's Martins Creek ballast. Thanks a lot Roz.

Below is a short video of a Garratt hauled coal train "in" the new Newstan.


Wednesday, April 1, 2020

Main North Derailment, Epping Seminar & Running Trains.

The Main North was derailed at the end of July 2019, re-railed months later.

At the end on July 2019, I had to changeover to the NBN that had been installed in the street some months earlier. I decided to stay with Optus to keep my web site url active, with their medium speed package and a Fetch Mighty unit to record "free to air" T.V. Subscribed to Netflix for the Boss. As I decided to drop my Foxtel, I had to get a new T.V and a digital Antenna.
The Internet kept dropping out but I was busy with family matters, until the Wireless Access Point was replaced in November.

A couple of weeks later, my Laptop died. Not ready for something new like getting a Windows 10 Laptop, this was going to be an issue, I was not "let" down.
I purchased a Lenovo Laptop and Office 365 as it included Outlook for my emails but Outlook didn't work as expected. Finally fixed by a "remote" Microsoft Technician that disabled the default "S Mode". No mention of this by the retailer.  Hours of time wasted here.

Issues with going to Windows 10 continued.

I do the service and warranty work for NCE here is Oz (via the Model Railroad Craftsman here in Sydney) and my Programmers did not work, I was buggered if I needed to program new chips. Along with "Driver" issues, when I downloaded the new software for one of the Programmers, the PICs I have to program were not in the included library. For this I got help from Mark in the U.S.
Help from Randall a local NMRA member also modelling NSW, got everything else working by the end of January including my QSI Programmer. I owe Randall heaps.

Now with my Laptop and Internet fixed, the Main North has been re-railed.

Each year I do a session at the Epping Seminar. 2020's theme was "Modelling the Prototype". I reluctantly agreed to "rehash" something I'd already done as I did not have the enthusiasm to spend time etc on something new.

This "rehash" resulted into doing videos with all the details on the screen to run the 5 following trains with the approximate Operator running time on the layout.
  • Double Garratt 1200 ton Newstan Coal train - 60 mins 
  • 50 Class R/End banked LCH Coal train up Fassifern Bank - 40 mins.
  • DEB Set Northern Tablelands Express - 30 mins.
  • Goods train rear end banked up Ardglen Bank - 40 mins.
  • The Down Glen Innes Mail - 60 mins.
Click here for a Track Diagram of the Main North 

Note: To run any of the trains on the Main North, Operators use an Operating Cards, described in a previous Blog entry. 

The 5 severely compressed videos run for a total of 28 minutes for the 40 minute session of the Seminar. The Seminar was cancelled 5 days out but I guess I'll do it in 2021.

A lot of videoing around Fassifern and Newstan Mine, suggested to me that during this COVID-19 "isolation", that many of use are having to do, I should upgrade my very basic Newstan Mine, maybe my next Blog entry.

Below a 7 minute video of the Double Garratt 1200 Ton Full Coal train from Newstan Mine to Port Waratah and back to Newstan Mine.


Below a 4.5 minute video of the 50 Class Rear End Banked Coal up Fassifern Bank.


Below a 4 minute video operating the 7 Car DEB Set Northern Tablelands Express from Armidale to Sydney and back to Armidale.


Below a 5 min video of banking up Ardglen Bank


Below an 8 min video of the Down Glen Innes Mail


Thursday, July 4, 2019

Audible Warning & Announcements for NCE EB1 Circuit Breakers.

To let modellers know they have a short circuit and not a loss of power, when their loco stops, I've fitted a Jaycar Piezo Buzzer to a few of my NCE EB1 Circuit Breakers.
As of about 2020, there is a new version of the EB1s that provides a 1.5 Amp Trip Current to work with the Power Cabs. 

Early version of the EB1 with Links to adjust Trip Current - middle bottom of photo.
Jaycar XC-4424 Piezo Buzzer connected to the the early EB1, shown below.


The Piezo Buzzer connects as shown to Terminals 3 & 4 of the Terminal Block with the "S" Lead of the Buzzer connecting to Pin 8 of the Chip as shown above.


Later EB1s, easily identified with a DIP Switch to set the Trip Current.
These later EB1s shown below with my 2 lead 5.0 Volt Buzzer mounted on the Terminal Block that's used for a remote Reset Switch and LED.


The Piezo Buzzer draws 29 mAs at 5.0 Volts and I wasn't sure if the chip could supply this extra current, I didn't want to blow up the EB1. 

My mate Andrew suggested using a NPN transistor like the  BC639 that I had on hand, to operate the Buzzer mounting it along with the Buzzer onto the Terminal Block as shown.

The Transistor connections are:
Base to Terminal 3 of the Terminal Block (Output from the Chip for the external LED).
Collector to Terminal 1 of the Terminal Block (Circuit Board Negative).
Emitter (centre lead) to the Buzzer Negative.

Buzzer Positive to 5.0 Volts at the circuit Board Feed Through, shown right.


With Operators running in both Broadmeadow (lower deck) and Werris Creek (upper deck), where lots of shunting/marshalling trains can be done at the same time, a buzz from either of the EB1's that are located in the same area, it's hard to determine which District is shorted without looking at which EB1 has a flashing LED. This ia a bit hard for a visiting Operator to know where to look. Yes the trains stop when there's a short but with Stay Alive they don't stop straight away. See below.


During a recent Operating Session, Operators asked what's the buzz noise in the Trainroom when running trains and another Operator, while setting up his trains in Gosford, felt he caused a few shorts as others were having trouble with running trains through Gosford. The Gosford EB1 did not have "noise" (Transducer). The easy fix would be to isolate the track used for setting up trains - I'll do that one day.

I wondered about another solution by having an "announcement" when a power district was shorted. I'm into recycling my train stuff even if it's 30 years old. Many years ago a I made a Digital Voice Recorder from the December 1989 Silicon Chip magazine, used with my son's Lego trains.
I found the Board along with a lot of other junk under the layout, I spent an afternoon mucking around with it to see it would work for the "announcement" solution. While it provided 4 announcements, each triggered separately, I was not happy with it.

Since seeing Dave Lowe's Arduino Presention at the 2018 Modelling the Railways of NSW Convention, I bought an Arduino Uno and a Stepper Motor from Jaycar to "try" and motorize  a Turntable from an article I saw in AMRM. Nothing done yet with that project.

Browsing around at Jaycar when I'm there for electronic components, I saw a 10 second Record and Playback Module for the Arduino. I checked the details on-line and thought I'd try one instead of using the kit above, but I did not want to use the Arduino Uno to make my announcements work. I needed one of these Modules to play around with.

Jaycar Record Playback Module XC4605

Shown below attached to an NCE EB1.


The Record Playback Module needs 5.0 Volts D.C. (not 12 V) and I needed to trigger it from the EBI instead of the Arduino so I need to use a Relay but a conventional "coil" type one would create more "circuitry" in my simple logic, so I thought I'd use a Solid State Relay from Jaycar, see:

Jaycar PCB mount Solid State Relay SY4090

Construction.

The Record and Playback Module comes with a Microphone installed.
Connect an 8 Ohm Speaker.
Provide 5.0 Volts DC and a "triggering mechanism" where both are normally supplied by the Arduino.

I soldered a 5.0 Volt 3 Terminal Regulator to the Capacitor on the EB1. I have since found that the EB1 has a 5.0 Volt Regulator already installed. I'll connect to that in the next EB1 upgrade.
I connected DCC to the EB1.
Press the REC Button while yelling your "announcement", to get the highest volume, numerous times until the "REC" LED extinguished (10 secs).

Pressing the "PLAYE" or "PLAYL" Buttons provided the "Short Circuit in Werris Creek" message.

Triggering the Module.

EB1 (default) Operation:
EB1's LED ON= Power to track. LED Extinguished = Short.
When there is a short. the EB1 disconnects the power to the track for 2 seconds then re-applies the power. If the EB1 still senses a short after 16 milliseconds then power is removed again for 2 seconds. This cycle keeps repeating until the short is rectified. Note the EB1 "settings" can be adjusted, see the Manual.
The Module has to be triggered each time the LED extinguishes.

Connections for the Solid State Relay are:
Pin 1 to the EB1's Terminal Block position 3.
Pin 2 to the EB1's Earth at Pin 8 of the 12F683, the IC adjacent to the Terminal Block.
Pin 5 and 6 to the "PLAYL" Switch. Note: Pins 5 and 6 connection are polarity conscious.

Now we know the the Operator in Werris Creek (upper deck), has to correct his "action" etc.


The Record Playback Module, Solid State Switch and the 5.0 Volt Regulator for the modification cost about $17.00 at Jaycar plus the EB1.

If using sound decoders, don't forget to to program the EB1's CV 135 to 4. For more details see the EB1 Manual AND Mark Gurries's page on the EB1

The completed "announcement" EB1 fitted behind the Fascia at Gosford. The Record and Playback Module is held to the EB1 with a Cable Tie and connected an 8 ohm speaker. The volume is more than loud enough with an old Traino 44 speaker with an easily made enclosure from some 27 mm (o.d.) conduit, 50 mm long.


The 6 Pin Solid State Relay "located" between the two boards, held with two links:
Solid State Relay Pin 1 to the EB1 Circuit Board Terminal Block's Pin 3 and
Solid State Relay Pin 2 to Pin 8 of the the adjacent PIC12F683 chip.
Solid State Relay Pins 5 and 6 (Blue and Yellow wires) are connected "across" the "PAYL" Switch of the Rec Play Module.
The 5.0 Volt 3 Terminal Regulator can be seen on the R/H side, soldered to the EB1's 470 uF Electrolytic Capacitor. Simple and it works.


The announcement of a "short" as a slack Operator runs against an incorrectly set Point in Gosford, see below.


If you want to make some of these "Annoucement EB1s" phone me on 02 9402 8929 for more details. I will take further photos as I make more of these "Annoucement EB1s".
I have made 5 of these Annoucement EB1s, all now using 5 Volts from the EB1 5 Volt Regulator, saving using a separate 5 Volt Regulator.


Monday, March 25, 2019

West Tamworth on my Main North.

Previously I wrote a Blog entry about Passenger Trains on my Main North and described that I swapped around the way Werris Creek worked, with the track from the rear Platform entering a 3 track North West Staging and the Front Platform track went onto West Tamworth instead of going to Gunnedah. This allowed a longer run of three of my "signature" Passenger trains, the DEB Set Northern Tablelands Express, the Brisbane Express via Wallangarra and the Glen Innes Mail.

For the Glen Innes Mail, I have included the 3 Coaches for the Barraba Mail that are removed from the Mail, at Tamworth. Secondly a 30T (3009) needs to be "light engined" from Werris Creek to Tamworth for the Barraba Mail.

I needed to upgrade my Tamworth particularly for the Barraba Mail "part" of the Glen Innes Mail.

Thirdly, the Mail with the ACS, CR and MHO, make the train heavier than the C36's load limit of 268 tons for the 1 in 40 grade. The 3616 hauled Glen Innes Mail will need to be double headed up the 1 in 40 climb from Murrurundi to Ardglen but on my layout, to Werris Creek.

Operating the DOWN Glen Innes Mail from Sydney now terminates "turned" in the Tamworth Sidings, has 5 engine "movements/changes" on it's run north. with a lot of "operation" centred around Tamworth and can take over 60 minutes to "run". See my latest Glen Innes Mail YouTube, below.

I needed to change the West Tamworth trackage (shown at right), to include easier operation/storage of the Barraba Mail etc.

Using a 1945 Track and Signal Diagram, courtesy of the ARHS DVD  shown below, there are many industries to model in West Tamworth.


The above 1945 show the following industries. A little research to find which ones were there in 1965. For starters I needed to model some of the following:
  • 250 foot long Platform with a Dock at each end.
  • Station Building that was from the diagram, about 150 feet long.
  • Goods Shed
  • 2 large Mills: West Tamworth Mills and Fielders Mill. 
  • Silo.
  • Stock Yard and Loading Banks. .
  • 2 Road Engine Shed
  • Small Coal Stage.
  • 60 Foot Turntable 
This section of the Main North Upper Deck is 15 feet/5 metres long and 3 feet wide. The photo shows my very compressed West Tamworth on the left and Werris Creek Cattle Pens/Loading Ramp and Mine (in the distant), on the right.

Good thing the 250 foot platform equals 3 feet in HO.

On the layout, the Station is on the "down" line closest to the aisle. Passing the Goods Shed, the line goes to the right for Armidale Staging and left to the Upper Deck Return Loop.
The Return Loop exits from behind the Mill connecting to the 3rd Loop, then "back onto" the mainline at the doorway.

Trains running from Werris Creek, Occupancy Detection on the Lift Up Bridge section, "sets" the Points so all trains go past the Station. With the Points selected for the Return Loop (not Armidale Staging), trains "turn" and appear on the 3rd Loop, passing the Silo, where a second Occupancy Detector operates the Points (opposite to that above), to bring the train back onto the single mainline. This provides automatic end of the layout, "turning" of trains so long as 3 "fixed" Points are set for their normal positions. Not prototypical but it provides the procedure I want. One day I'll add switches to these 3 Points for some form of warning. I could have used a Tony's AR PS One but I wanted to make something and I already had the Auto Reverser. 


I located the 6 Tamworth Sidings including a Fuel Depot and a Mill
at the northern end of Tamworth.

The Glen Innes Mail and the NTE are stabled in these Sidings, ready for their runs to Sydney.

The Tamworth Loco with a 60 foot Turntable and a single line Engine Shed is located between the fascia and the Sidings as shown,  Access can be gained from any of the 3 Loops.

The Centre Loop opposite the Station provides the "storage" of the the Barraba Mail's 3 Coaches and 3009 when the Glen Innes Mail is at Tamworth Sidings, ready to be connected to a UP Glen Innes Mail to Sydney.

I am still thinking of how to add track and a Return loop for the Barraba Line but this has to wait, so the Middle Road and shunting will have to do for running the Barraba Mail.

While remodelling Tamworth, I added the track crossing the mainline from Ardglen to Werris Creek, using a 90 degree Crossing, to the existing but not connected, Armidale Staging (6 tracks above Newcastle).

I wanted Armidale Staging to be as low as possible and I did not want a Bridge over the mainline.
I have changed how this Staging was to work, initially thinking I could add a further Return Loop (over Murrurundi) but it hasn't happened.


This "crossing" is "signalled and interlocked" (May 2019), using the Bracket Semaphore (shown at left) and a colour light Signal controlling the exit from Armidale Staging, so you cannot run out of Armidale Staging without first selecting the Point (shown at left) to Armidale and the Ardglen to Werris Creek "block" is NOT occupied. I used a colour light signal instead of a Semaphore as it does not need Servos or part of a Octopus III, making this a simple "signal" control of Staging.

I added scenery using my foam packaging method and added plenty of home grown Autumn Joy Sedums to hide the "90 degree crossing".

The Upper Deck of the Main North here at the aisle way from the Trainroom is 1570 mm from the floor. For Operators and especially the vertically challenged Marcus, I added a platform 300 mm above the floor to 3/4s of the Aisle way, making the height now a very comfortable, 1270 mm.

There are never enough Staging Tracks on a layout and with 30+ trains trains "staged" for an Operating Session, this new Armidale Staging shown below, helps a lot and is the new location for holding the Down Glen Innes Main and the Northern Tablelands Express, ready for their run to Sydney.


A March 2020 Glen Innes Mail 9 minute video is at YouTube:

https://www.youtube.com/watch?v=aNgBkV6CWaY


Wednesday, May 9, 2018

My Revised Signalling Theory & the SCMRA Epping Seminar.

At the 2018 SCMRA Epping Seminar, I did a Clinic describing the way I've signalled the 40 metre single line section from Broadmeadow to Werris Creek on my Main North layout using Semaphores to provide bi-directional running by rehashing my Jan 2017 Semaphore Signalling Blog entry, where all the Operator has to do, is set his road (Points) and closely observe the Signals. The rest is automatic.
Instead of using text and photos of the spaghetti jungle under the layout, I made a schematic of the "electrics".

How it works
There is no computer input, DCC Accessory decoders or Throttle operation controlling the Signals. Operating the Control Panel Toggle Switches if appropriate, provides a "ground" for a Red and an "open circuit" for a Green, "input" to the Tam Valley Octopus III to operate the Semaphore's Servo.
With "occupancy" detected by the BD20 etc, (current flowing to the loco) of the Block "ahead", the appropriate two GREEN Signals are positioned to RED, shown below.


BOTH Operators have a Green. Who goes FIRST?


Either one but as soon ONE moves into Block 2 the OTHER has a RED.
Make sure "your" Signal is green before passing it.
I could add some sort of  time delayed removal of track power, in this above scenario, to Blocks 1 and 3, to correct a slack Operator not paying attention to his Signals - lots of time and effort. It is much easier to banish a serial offender to make the Coffee.

The above circuitry is repeated 4 times for Blocks 1, 3, 5 and 7, see below, to only provide one train in the Block. Trains are allowed to pass in Blocks Broadmeadow, Blocks 1, 3, 5 and Werris Creek. Home and some more Distant Signals will be added later.


While this above basic signalling method is not "exactly" prototypical of what happened on this section of the Main North in 1965 where hundreds of staff  controlled the trains, it provided me what I wanted, bi-directional running, keeping Operators apart on 40 meters of single line and it's automatic. See the below layout video:


If you want to make it more difficult to understand, see my original Blog entry at:  http://mainnorth.blogspot.com.au/2017/01/

SCMRA (Southern Cross Model Railway Association) Epping Seminars 
These are held in April at the Epping Creative Center here in Sydney, focusing on the railways of NSW with lots of prototype and modelling ideas etc. Each year there is a "theme". Keep an eye out for details in AMRM etc. 

This year it was "The Railways of Southern NSW", with the schedule of the Day copied below. In each Seminar, numerous Clinicians talk/demonstrate about a topic, in this case, about the Main South. While my talk was not exactly about the Main South, I showed how to implement Semaphore Signalling in the "South", similar to what I've done on my Main North. 


These Days are excellent for NSW modellers of any era. I hope to see you next April.
The Whiteboard had a list of suitable themes for 2019, with the "Main North" having the highest interest (and I only voted once). Fantastic-  right up my alley. I will do a Clinic and offer a visit to my Main North layout.


Thursday, December 14, 2017

Sceniced Murrurundi

With a large portion of the Main North now having some scenery but ballast is still to be added to the track, I'd like to make the locations/stations more accurate to the 1965 era I model. Painting my heritage coloured “photo station” of Murrurundi my mate Brian made for me (shown below), was out of the question. With regret I needed to replace Brian’s Station that has worked for years – thanks Brian. 


Scenicing Murrurundi was the ideal time to making a new Station. I spoke to Matt Sawtell at Models N More about making a Murrurundi Station. I sent him the photos I had taken in 2006 and the 1962 Black and White photo below. 


Matt made up a Laser cut Kit with a footprint 560 x 140 mm, shown below partially assembled and undercoated.


Now to paint the Station with 1965 colours, pretty hard using a black and white photo courtesy of the NSW Heritage site (below), so I needed some help here.

I have done a few Presentations for the Epping Seminars, MRNSW etc and enjoy researching a project/model using all of the AMRM, Roundhouse and Books I have collected, done much easier using Mag Index.
Oct 81 Roundhouse has a Byways of Steam article - Murrurundi, detailing the Main North from Murrurundi to Werris Creek but no photos of the Murrurundi Station.
Byways of Steam 3, has an article about Murrurundi Loco but no Station photos.
I contacted the Des Duggan at the Murrurundi District Historical Society. Des sent me a 1980s photo of the Station but I was still not sure what the colours were in 1965.
I asked numerous modellers including James McInerney for some help about the colours of the Station in 1965. James contacted numerous modellers with Ray Love and Chris Sim sending some colour photos.
Lucky for me, Ray sent some “end on” 1965 photos that provided the overall colour of the Station but no “front on” photos to help me with the door door/window trim Awning Bracket colours. Chris sent me two 1985 photos.
The "Northern Exposures" book has a Murrurundi photo with the train blocking out the Station with just one Chimney in view but showing the Elevated Water Tank and Shed, helpful for modelling the Yard.

From the 2006 photo I sent Matt, he included a wire grille with Station sign across the front Signal Box at the Newcastle end of the Station. I needed to have a "1965" Signal Box.

Des from the Murrurundi Historical Society explained that he was told the Shed at the Newcastle end of the Station was open because it was the Signal and Points Shed but he needed to check.
Lucky for me the Oct 1981 Roundhouse Article had a photo showing the Lever Frame of the Signal Box and the photo caption said “The Interlocking Machine at Murrurundi was housed in an “open-fronted Enclosure” – Thank You both Des and P. C. Booth.

With the above description and Graeme Skeet’s 1983 photo on Rolfe Bozier’s NSWrail.net web site, (copied at the left), I made my “open fronted enclosure” Signal Box, complete with a 12 Lever Machine made from Styrene Strips and added a Murrurundi Track Diagram to the back wall, shown in the my photo below.


I also slightly lengthened the building to fit my Signal Box and modified the Roofs. My completed Signal Box as viewed from across the tracks.


James suggested some Tamiya Paint colours including the XF Numbers for the two Roofs/Awnings, Doors, and Trims Door/Window Trims. This made my life a lot easier - thanks James. 

Using the photos and discussing the paint colour with Ray, I found a slightly pink (flesh) colour, LifeColor Diorama Series UA 707 at Microhobbies in Hornsby. Thinned it with water and sprayed the Station with 4 coats. 

The completed Murrurundi Station, shown below, with my mate Brian next to his Council Station Wagon, picking up a parcel, that he did many times when hew worked at Murrurundi in the early 70s.
I need to add some Down-pipes and a few other detail parts. 


My Murrurundi is located on one side of a 4.5 metre Peninsular with the Station and Loco on a 410 mm wide shelf, 1440 mm from the floor. 
When I added Hawkesbury River Bridge to my layout, I decided that the deck above it needed to "thinned out" and Muswellbrook along with the Oak Dairy had to go but what to do with the the OAK Dairy, that I'd spent hours making. I wasn't going to store it under the layout so I placed it on the Peninsula Blob (Sydney end of Murrurundi) .
I needed to “isolate” the OAK from Murrurundi Station a little. I made a small hill and planted some trees (below).


Along the length of the Station/Yard, I added a higher than track level Fascia, with lots of shrubs and trees. Halls Creek (added previously), is between the Yard and Loco. In the Yard I added a 5,000 gallon covered Elevated Water Tank and a Shed. A Goods Shed is located between the Yard and Halls Creek with a track going back to the Dock at the Station. 


For Loco, Brian had previously made me a dilapidated Loco Shed, that existed in 1965. I added the Workshops etc on the backside of the Loco Shed., one covered Elevated Water Tank (will be two one day), and a few other buildings as shown in the Byways of Steam 3 article about Murrurundi Loco Depot.
A Structurama Kit substituting as a Barracks until I build a more suitable one. 
On the track to the Turntable, I added a loco de-ashing Pit and a Depressed Road with an S wagon.


Thanks to my mate Brian for his models: the previous Station, the dilapidated Engine Shed and the steam powered Coal Grab for Murrurundi Loco, Matt at Models N More, Ray Love, Chris Sim, James McInerney, Ray Pilgrim and Des Duggan (Murrurundi Historical Society), Byways of Steam and Roundhouse Authors/publishers, I was able to make a 1965 Murrurundi.

I've added the newly sceniced Murrurundi to the Main North Video, at the 5 min 50 sec mark, see:
https://www.youtube.com/watch?v=biFOG0e6IHo&t=427s


Tuesday, September 19, 2017

Main North Layout Video

The recent progress on the layout's scenery, as shown in my previous Blog entry, has even shocked me. The major job left in completing the layout, is ballasting the track, but...

When building the layout, I was always in a hurry to get track down and run trains to test the track "plan", with the idea that it will change after running some trains. Yes it has, hundreds of times but now the scenery encompasses the track, there won't be many track changes. Rail Joiners and minimum droppers that until now have provided for so much fun, more so now that the scenery is there, will not provide the fun I need, after I add the ballast with the glue creeping into the solder less joints rendering current flow at best, intermittent. I am surprised that my electrics (really a lack of), have provided for mostly trouble free running, for so long. My attitude was that when there was an electrical problem, I'd attend to it - then. So now there is a BIG electrical problem and I have to attend to it now.

I'll take the rest of my life "bullet proofing" the electrics and then adding the ballast but I can still play trains with my Mates on a sceniced layout with operational Semaphores on most of the single main line, keeping the Operators, apart. It can't get much better, Hey!

I'm now scared I might finish the layout, so I'm gunner slow down a bit, so that doesn't happen. I don't want to rip up the Main North to build another layout. I want to leave that to the Kids to do, they've got to earn their inheritance, hopefully not too soon though.

To celebrate, to what I thought was the biggest obstacle in building the layout, adding the scenery, I thought I'd take a video. I've edited this video to add my newly sceniced Murrurundi (Dec 2017), click below:


PS. I've just remembered the box of Bracket Semaphores, under the layout and building numerous Control Panels etc to make them work, is another "scenery length" job, on the layout. So much more to do.