NSWGRs installed Overhead Wiring on the Short North as far as Gosford in 1959, then to Newcastle in 1984. My era is the mid 1960s, so I need to have some Overhead on my layout. I had intended on having the Overhead installed prior to purchasing Southern Rail's 4 car Interurban Set in about 2011 but it didn't happen. Then I purchased a few Auscision 46s in 2015, still no Overhead on the layout but I introduced the changeover to/from 46s at Gosford to/from Sydney. Good thing the Auscision 46s can run without the Overhead.
My mate Geoff S regularly visited the Main North, where the two of us would run some trains but yacked most of the time. I had seen Geoff's Mullet Creek layout where he installed the Overhead Wires. Note: Geoff's Mullet Creek layout can be seen at Auscision Showroom & Geoff was instrumental in Southern Rail releasing their Stanchions.
Numerous times we discussed adding the Overhead to my Main North, even discussing adding his Mullet Creek module to my layout but I had to decline his kind offer as there would be too much modification to fit it into my Mullet Creek. Geoff suggested I purchase some Code 83 track, Insulators from Tichy & .025" Phosphor Bronze wire and make my own Stanchions. This was about 10 years ago. I also bought various lengths of Marklin Catenary wires.
April 2023 & I've made a start on installing the Overhead, firstly at Hawkesbury River mentioned in my last Blog entry. I soon realized that I did not have enough of the Marklin Catenary Wires to complete my Overhead through to North Gosford. Six months ago my mate Spencer gave me some Sommerfeldt Catenary that he was going to install on his Hornsby layout, including 9 x 500 mm lengths. I made numerous enquiries about getting more of the Marklin & Sommerfeldt Catenary.
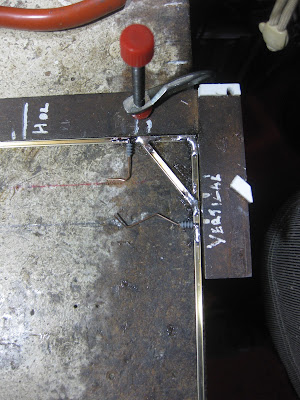
Making Single/Double/Quadruple Stanchions were made using a crude Jig using a small metal Square clamped to my workbench for the 90 degree angle with marks in positions for Corner Braces, Hanger & the Horizontal Brace, on the Bench. The Stanchion's vertical Posts were 130 mm & the Horizontal length according the actual location (1, 2, 3 etc.) tracks. Added a couple pieces styrene for easier cutting of the rail for the Corner Braces & threading of the Tichy Insulators, onto the .025" Phosphor Bronze wire after poking my fingers, too many times.
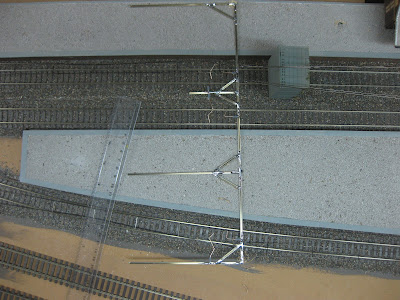
The positions of the vertical post/brackets, across the horizontal was determined per location, as shown for a Stanchion straddling the 3 tracks on Gosford Station.
For the Hawkesbury River Bridge, I used 6 lengths of the 500 mm Sommerfeldt, adding some Marklin Catenary to make installing the Stanchions easier & temporarily held in place by clothes pegs, shown below:
I stored all of my Catenary Wires in a drawer for easy access especially useful when doing my Gosford station & Yard.
Doing a rough calculation, I figured I'd have enough to finish off my Overhead through Gosford.
Working out which length of Overhead was necessary, was a bit of trial & error by adding Stanchions & trying a 46 under the temporally installed wires. Many holes drilled besides the track to reposition the Stanchions.
I've "wired" the layout to across the Broadwater just south of Gosford. To go further I need to complete my Gosford Station & Yard, shown below, as it used to be prior to May 2023.
I knew it would be difficult to manually operate Points with Overhead installed so I test fitted a Slide Switch to one of the Rod/Tubes years ago. I purchased 20 Slide Switches & Rod/Tube for all of my North Gosford Points. thinking this would be the way to go.
The Gosford Re-work will be my next Blog entry. It has been done & road tested by Visitors in two groups over the last 3 weeks, with minor issues to fix, see below:


.JPG)
.JPG)
.JPG)

.JPG)
The effect of all that lacy overhead is magic. Having installed all the catenary on the Yendys exhibition layout, I can really appreciate the difficulty you had. Making a height jig to fit between the rails, gave me consistancy for the contact wire to stay centered over the line, as well as maintaining a constant height. It is good that you added insulators, although there should just be 2 insulator discs for 1500VDC, not the 4 you have used. Sorry
ReplyDeleteHi Rob. Thanks for your comments & your articles on Yendys. After more road testing of the Catenary, I'll glue in my Stanchions & fit all the concrete bases. My initial Stanchions installation I hadn't decided whether I had the Pantographs touching. A visit from Geoff reinforced my initial decision of "touching". I really enjoy the Pantographs moving up & down. I wish I used 2 Insulator discs, my L/H Index finger wouldn't be so damaged.
ReplyDeleteFantastic Marcus! Are the concrete bases going to be 3D printed, it would be a good simple start to drawing in 3D, let me know.
ReplyDeleteRay P
crikey, slow down, that overhead crew, you're going to quick, overhead to Gosford, I will have to come down to the Main North and distract you with some more yakking to slow you down, nah WELL DONE MATE, who would have though over 20 years ago when i seen the Main North there would be overhead to Gosford, the rate you're going you'll will finish this layout in another 30 years' time,
ReplyDeleteHi Ray. My concrete Stanchion bases are/will be Styrene Evergreen 253 square tube (4.8 x 4.8mm) & 9 mm high. Tube painted my concrete colour prior to cutting to length in my Chopper. Then I slice one corner to fit to the installed Stanchions. Thanks for the offer of printing them in 3D.
ReplyDeleteHi Geoff. Thanks for your compliments. Thanks for all your help & yaks over the years. I am enjoying scenicing the layout & getting Gosford 95% done (my next Blog entry), was very satisfying as I was always putting off doing it, as there was so much to do. Now it's done I can slow up & play trains again & finish the rest. Please call in next time you're down.
ReplyDeleteThis comment has been removed by the author.
ReplyDeleteThis comment has been removed by the author.
ReplyDelete