Above is my Gosford complete with the Overhead. Click on the photo to see the Main North Album at Flickr

Saturday, July 1, 2023

Overhead Wiring on the Main North.

NSWGRs installed Overhead Wiring on the Short North as far as Gosford in 1959, then to Newcastle in 1984. My era is the mid 1960s, so I need to have some Overhead on my layout. I had intended on having the Overhead installed prior to purchasing Southern Rail's 4 car Interurban Set in about 2011 but it didn't happen. Then I purchased a few Auscision 46s in 2015, still no Overhead on the layout but I introduced the changeover to/from 46s at Gosford to/from Sydney. Good thing the Auscision 46s can run without the Overhead. 

My mate Geoff S regularly visited the Main North, where the two of us would run some trains but yacked most of the time. I had seen Geoff's Mullet Creek layout where he installed the Overhead Wires. Note: Geoff's Mullet Creek layout can be seen at Auscision Showroom & Geoff was instrumental in Southern Rail releasing their Stanchions.

Numerous times we discussed adding the Overhead to my Main North, even discussing adding his Mullet Creek module to my layout but I had to decline his kind offer as there would be too much modification to fit it into my Mullet Creek. Geoff suggested I purchase some Code 83 track, Insulators from Tichy & .025" Phosphor Bronze wire and make my own Stanchions. This was about 10 years ago. I also bought various lengths of Marklin Catenary wires.  

April 2023 & I've made a start on installing the Overhead, firstly at Hawkesbury River mentioned in my last Blog entry. I soon realized that I did not have enough of the Marklin Catenary Wires to complete my Overhead through to North Gosford. Six months ago my mate Spencer gave me some Sommerfeldt Catenary that he was going to install on his Hornsby layout, including 9 x 500 mm lengths. I made numerous enquiries about getting more of the Marklin & Sommerfeldt Catenary. 

Making Single/Double/Quadruple Stanchions were made using a crude Jig using a small metal Square clamped to my workbench for the 90 degree angle with marks in positions for Corner Braces, Hanger & the Horizontal Brace, on the Bench. The Stanchion's vertical Posts were 130 mm & the Horizontal length according the actual location (1, 2, 3 etc.) tracks. Added a couple pieces styrene for easier cutting of the rail for the Corner Braces & threading of the Tichy Insulators, onto the .025" Phosphor Bronze wire after poking my fingers, too many times. 
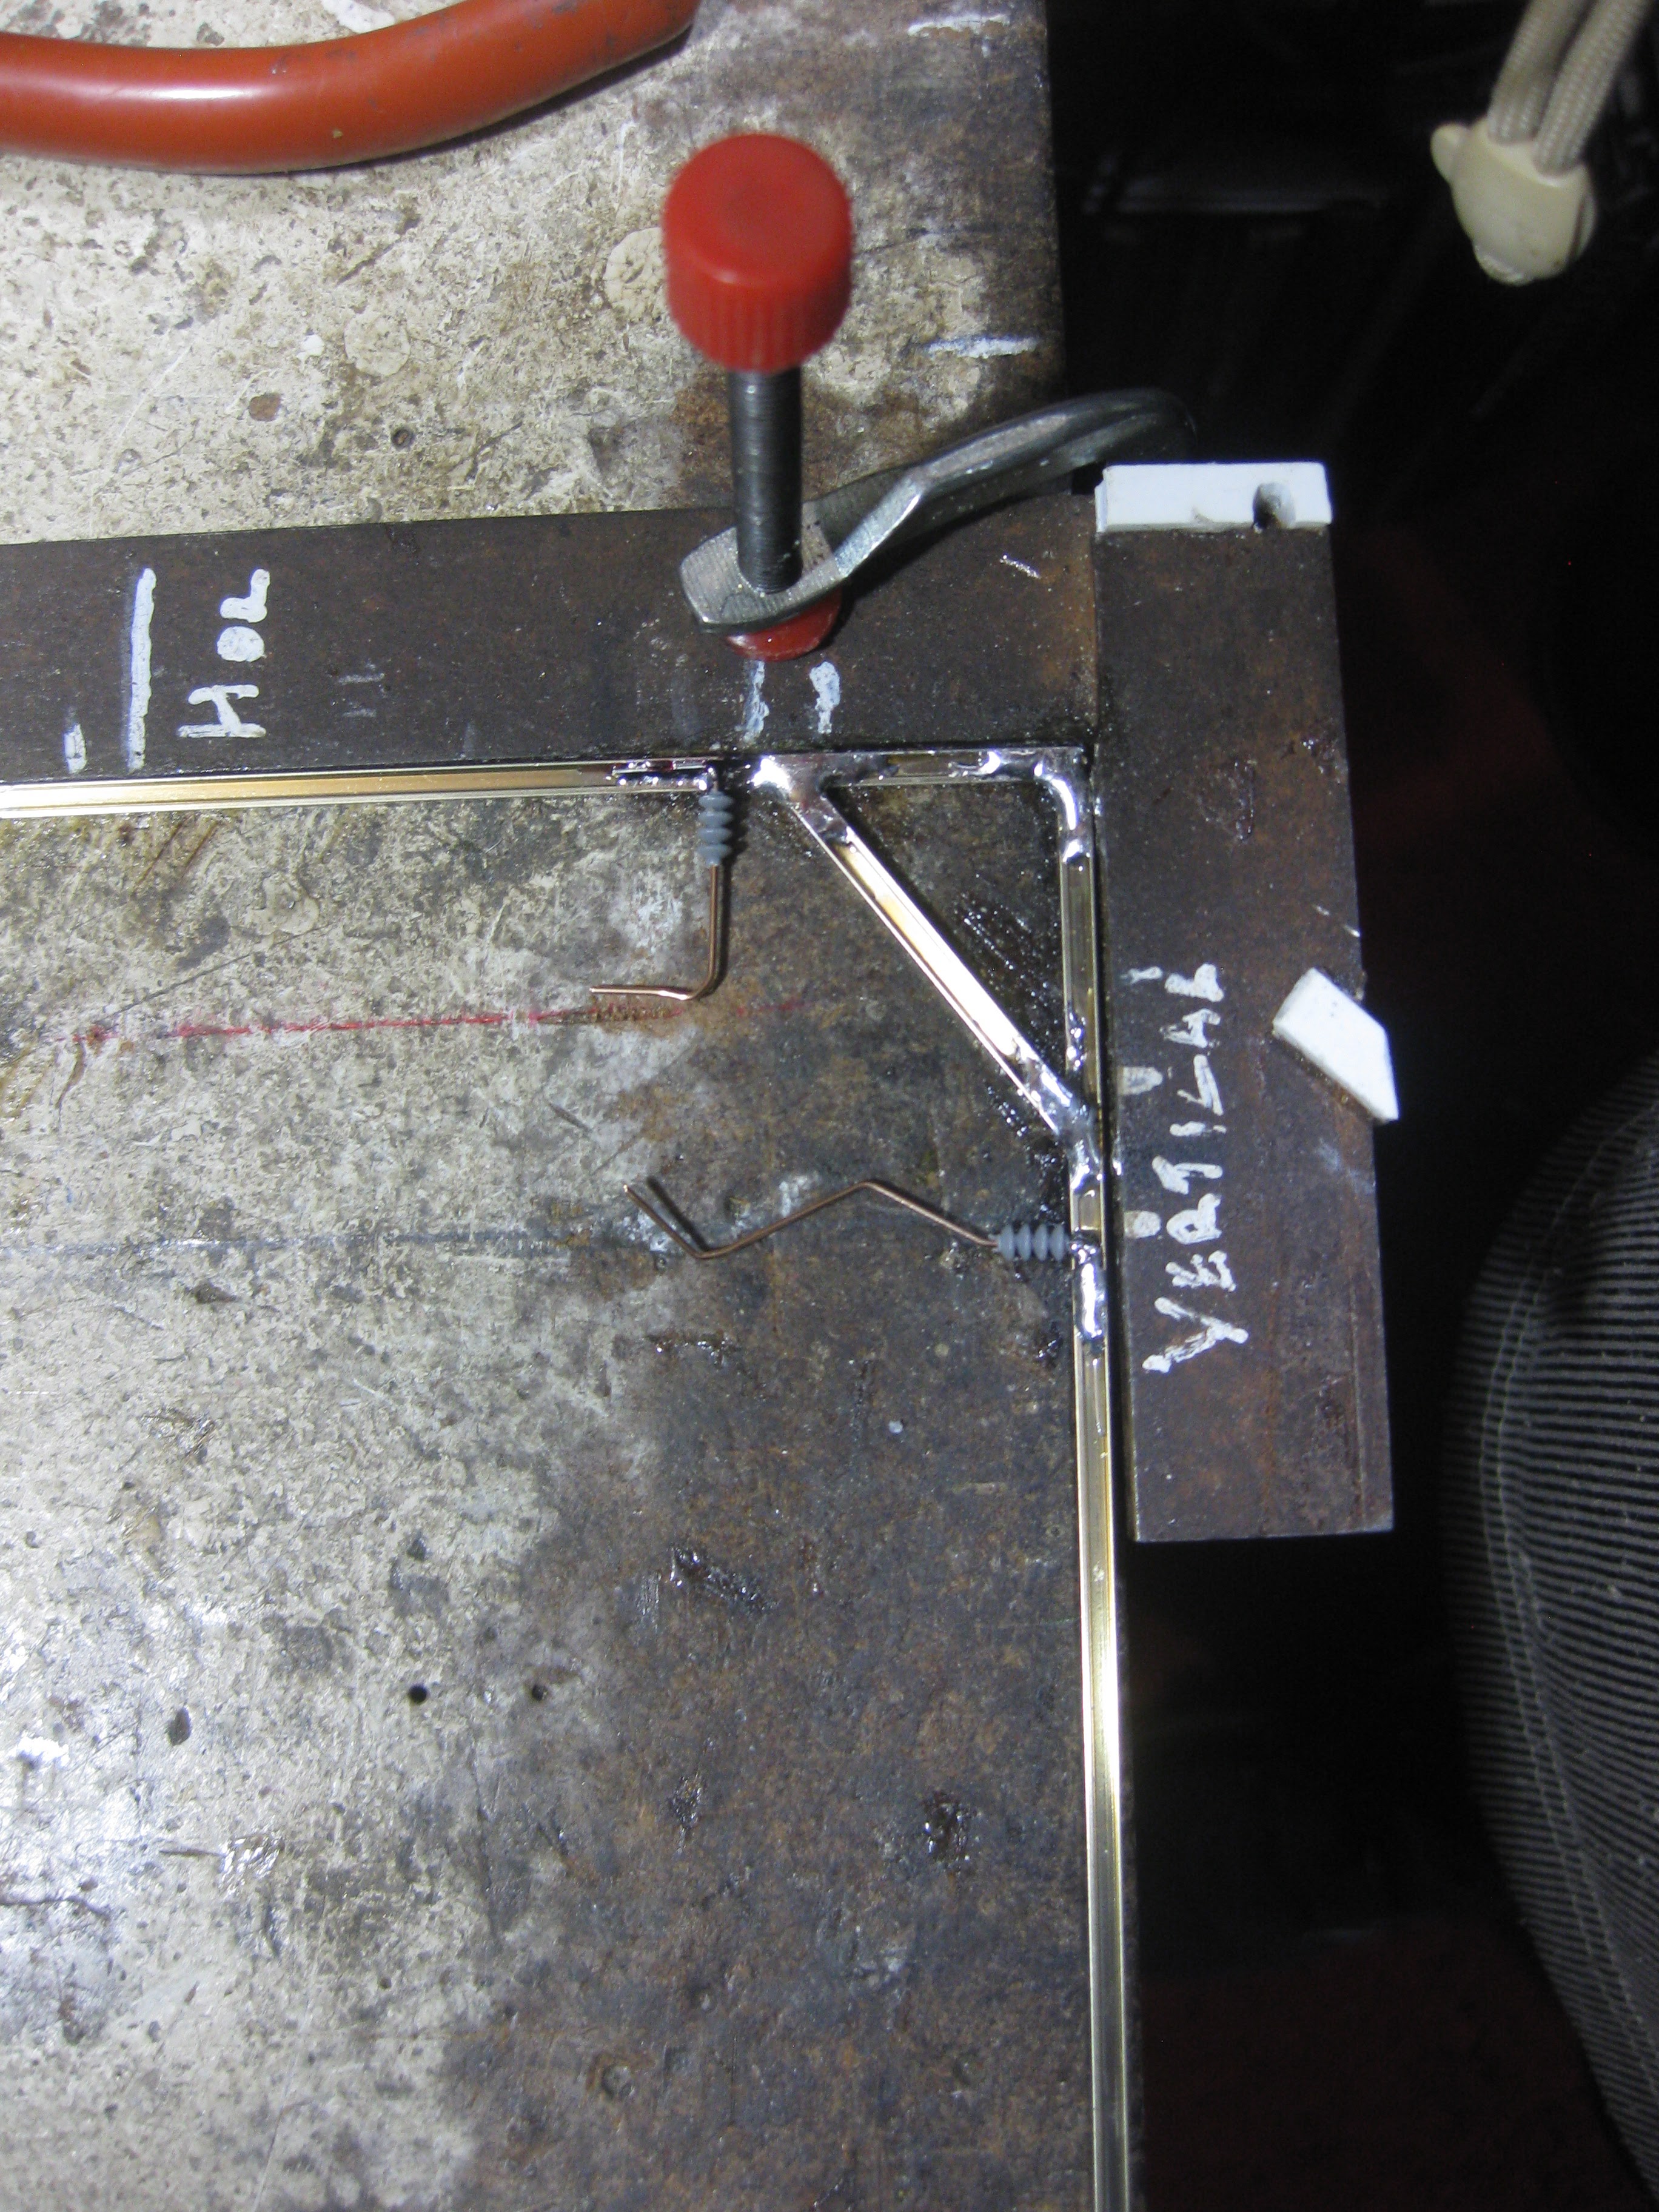
The positions of the vertical post/brackets, across the horizontal was determined per location, as shown for a Stanchion straddling the 3 tracks on Gosford Station.


For the Hawkesbury River Bridge, I used 6 lengths of the 500 mm Sommerfeldt, adding some Marklin Catenary to make installing the Stanchions easier & temporarily held in place by clothes pegs, shown below:


Instead of installing Catenary in my 3 tunnels, I "ramp up" the first & last wire as it enters/leaves the Tunnel, so the Pantograph isn't touching anymore. This saves on the amount of Wires & Stanchions, more importantly time. Note I have about 6 metres of Tunnels plus up Cowan Bank & 7 Loops & Sidings of Sydney Staging that's under 100mms under Broadmeadow.
 
I found, as with the Hawkesbury River installation, the Catenary needed to be "tensioned" to keep it in place, instead of going sideways with the pressure of a Pantograph under it - sideways too much & the Pantograph fouled in the Catenary wires. I made some crude "Tensioners with Telco wire & pegs. Twisting the peg until the Catenary was "tight enough". Many of the Tensioners are in Tunnels, rough enough is good enough & it works. Out in the "open" this rough method is replaced with a piece of Piano Wire anchored on the Stanchion & the ground after making the tension adjust as above. My rough adjustable Tensioners are shown below:


I stored all of my Catenary Wires in a drawer for easy access especially useful when doing my Gosford  station & Yard.


Doing a rough calculation, I figured I'd have enough to finish off my Overhead through Gosford.

Working out which length of Overhead was necessary, was a  bit of trial & error by adding Stanchions & trying a 46 under the temporally installed wires. Many holes drilled besides the track to reposition the Stanchions. 

I've "wired" the layout to across the Broadwater just south of Gosford. To go further I need to complete my Gosford Station & Yard, shown below, as it used to be prior to May 2023.


I knew it would be difficult to manually operate Points with Overhead installed so I test fitted a Slide Switch to one of the Rod/Tubes years ago. I purchased 20 Slide Switches & Rod/Tube for all of my North Gosford  Points. thinking this would be the way to go. 

The Gosford Re-work will be my next Blog entry. It has been done & road tested by Visitors in two groups over the last 3 weeks, with minor issues to fix, see below:


Friday, April 28, 2023

Hawkesbury River Upgrade.

My Hawkesbury River Station platform needs surfacing & the area especially around the Marina, needs sprucing up.  

I had previously made a curved 3.0 mm MDF platform top. To surface it, I used the same  method I did for Broadmeadow & Sulphide Junction, for details click here . With the top off, I trimmed the base pieces for a better fit then added brick facing paper to the front edge. 

I had a "suitable" Sydney Suburban Station kit built already. It should have a Signal Box on the up end but it'll have to do for now. I added a Stuart Walker Platform to Ground Footbridge & two Sheds on the up end. With a few seats & people, it's nearly completed. 


I added the Railway Crossing at the southern (Up - Sydney) end with a Signal Box that controlled the boom gates. I tried a yellow pencil for the double yellow lines at Rob's suggestion in the Broadmeadow Comments but it didn't work. I borrowed a Bow Pen but I can't make the lines so I 'll try a fine yellow Marker pen. I'll also need to "centre line" the road in front of  the shops & hotel.


I started to install Troughs for the signal wiring that are very prominent in the 3 photos of Hawkesbury River Station in the Country Station Books (Book 3). I bought an Anton's $12 Trough kit that'll make about 350 mm of Troughs, that means I need about 10 kits for my 3 metres, that'd be $120 & it'd have nice brackets. 

Instead, I used styrene strips & using a Jig to drill the holes for the Supports, 25 mm from the track, with the posts about 8 feet apart.

With the first strip of Trough fitted, I suddenly remembered I was going to install Overhead Wires to my Main North from Hawkesbury River to Gosford.  

I removed the Trough. 


Many years ago I had purchased at the recommendation of Geoff S of Mullet Creek layout fame, a packet of Code 83 rail, Tichy HO Insulators, 0.025" Phosphor Bronze wire to make Stanchions & plenty of Marklin Catenary. I used the above Jig to drill the holes for my Stanchions. Now I've done Hawkesbury River station, I'll need to get more of the Marklin Catenary. Installing the Overhead will be my next Blog topic.

I added a bit more land on the road to McKell Park (towards backboard) & found a building under the layout, sprayed it grey. It'll do for my Marina Office/Workshop. Made a Ramp down to water in front of the Workshop & added a couple of Jetties that are waiting for some 3D printed Row Boats. Added a Pilot Boat, cause that's what I found once again under the layout, tied up to the closet Jetty in the "corner".


Using the applicable Facebook group for inspiration, my Marina area is a poor representation but much better than what I had before, so it'll do for now. 

I added fences to the road to Long Island on the Causeway adjacent to railway & added the Brooklyn Ferry Wharf.

As can be seen, a very basic & incomplete model of a boat, is tied up to the Brooklyn Wharf, hopefully I'll find the rest of the kit & it'll be the ferry to Dangar Island.


I was given an 80 foot Sardine boat kit, that's too big for my Marina, so you'll see the hull tied up to a wharf under my Hawkesbury River Bridge. I must & complete the boat as I have the parts but not a high priority at the moment, much to the disgust of John H in Brisbane, who gave it to me.

Adding the jetties etc was done after I had installed the Catenary that made the job even harder. Soldering the last of the Overhead, I tripped over the Soldering Iron's chord with the Soldering Iron & Stand, falling from the above shelf (my Newcastle station) & it broke the first Stanchion I'd made. At least it didn't land on my Footbridge that would have broken in half or on the Station/platform that would have been much harder to repair. 

I added the Troughs, modifying the Jig after using it to drill holes for my Stanchions & platform Lights including Nameboards to fit the 8 font "Hawkesbury River". 

For the Comment from my South Coast Rail mate, there was a General/Fast Food Store in 1965 across the road from the Pub, see below. Bit different now in 2023. 


Friday, April 14, 2023

Sulphide Junction Upgrade.

My Sulphide Junction had 6 tracks in all, the Up & Down main line, an Up & Down Refuge Loops & two Exchange Sidings off the Up Refuge for the Sulphide Works at the southern end & the Cardiff Locomotive Works at the northern end, off the Down Refuge. 

The running of the W44 terminated at Sulphide Junction with the Garratt + 36 shunting the CGs & Van  into the Exchange Sidings. Government locos could not be operated into the Sulphide Works. The Sulphide Shunter (a 44 Toner), shunts the CGs further into the Works.

The Cardiff Locomotive Works opened in March 1928, replacing the Honeysuckle Workshops in Newcastle. Many of the workers came by train but I didn't have Station. The only action from my Cardiff Locomotive Works was the occasional "light engine" running of 5717 to/from Sydney. 

I wanted to add a Station so the Workers at "my" Cardiff Locomotive Works, could catch the train, with a short walk along the Siding, into work. Without much happening on the Down Refuge, I removed the Down Refuge Loop then moved the Down mainline against the fascia that gave me enough room for an Island Platform. The Siding into the Works now comes off the main.   

I added more "saw tooth" workshops, a Boiler Shed  & Change Room/Showers with an Office so the Workers could bundy on & off.


For the Station platform surface I used the white sand/Oxide mixture I used at Broadmeadow, adding a little more Oxide for a darker asphalt surface. I wanted to experiment with the colours of asphalt as I have to make a few more platforms - Fassifern, Gosford & Hawkesbury River.  

I built the second Joe's PC3 Station kit I found under the layout, added a C2 Toilet from Scale Model Co & Antons Station Lights, 


I added a Signal Box against the backboard from Stuart Walker with the Footbridge, also one of Stuart's kits. 


I added a Road Bridge crossing the mainline at the summit of my Fassifern Bank on the peninsula, providing a "back road" entry into the Sulphide Works, a Walthers kit.


Now to include stopping at Sulphide Junction for some of my passenger trains.

Now onto Hawkesbury River Station, that'll have Marklin Catenary fitted that I bought years ago.  


Tuesday, March 14, 2023

Broadmeadow Upgrade & Signal Boxes.

A lot has happened on the Main North since I last posted about loosing my web site. I spent two weeks in hospital, getting home just in time for Christmas. Now I'm workin' on the railway.

I had previously posted about adding Point Motors & Control Panels to the Upper Deck locations & the hard to get/reach Points in Sydney Staging but the rest of the Lower Deck will stay as manually operated. 

Lately I added ballast to Broadmeadow so the Point's are "sealed in". Broadmeadow has been a major location on my layout & it's taken 30+ years to add ballast - nothing done quickly on my Main North. 

The "L" shaped Broadmeadow Yard, is in the train room.


With the Station Platforms, on a 40 cm wide by 2.2 M long section, in the aisleway in the garage. The up & down go a further 2.0 M to the Points into Newcastle or up to Murrurundi, Werris Ck & Armidale, using a single line.   


Joined together at the "cutout" in the brick wall.

Also shown is the Broadmeadow South Signal Box for the Points at the northern end of the Yard. 

Operating the Points in this "Cutout" area would be difficult if my Lambton Rd Over Bridge was mounted above them, in it's correct southerly location. 

I swapped around Broadmeadow & Lambton Roads & included the Broadmeadow Rd Level Crossing at the "Cutout". including Boom Gates that hopefully will be motorized. 

I added a Colour Light Signal as Broadmeadow to Hamilton Junction had them from 1935 as written in the Byways of Steam 22 article. I will add some more as I've accumulated many, hopefully adding the Occupancy to control them.  
Adamstown Signal Box controlled the Points at the southern end of the Yard, located adjacent to the the Lift Up Bridge into the Train Room, shown left.

Signal Boxes & Platform Steps are Stuart Walker's Model Railways kits, easily assembled - look they're on the layout so they must be easy.


I found two of Joe's Pc3 Station kits under the layout. Assembled one without it's base for the Booking Office, painted it & mounted it onto some 3.0 mm MDF, I thought it was a good substitute plus it's on layout issuing tickets to the lucky passengers . 

Adding Stuart's Platform Steps kit, got the passengers onto the platforms.

I glued Evergreen #159 styrene strips (6.3 x 1.5 mm) to the edges of the platforms, painted them with Tamiya XF-20 Medium Grey.


Troweled in my whitish grey sand & sprayed with Ballast Glue mix. I admit I should have added a little more black oxide to get them a little darker. Now they're dried & completed, they're much better than the 3 mm MDF I had.


Made a visit to Glen's Scale Model Co, the new hobby shop, 10 minutes from me, at Thornleigh.  I purchased some of Anton's Platform Lights that come with Nameboards & a Baggage Trolley kit. 

I printed "BROADMEADOW" in the smallest size font (8) & it just fitted onto the longer Nameboards.


My existing platform buildings will do until I scratch build some new ones, maybe. 

Added a hedge to the fascia, using Clumping Foliage & a couple of large Flower Pots.  


Now for the width of Lambton Rd, I found some photos in the Broadmeadow Station & Loco Facebook group, one taken from the end of the Booking Office looking towards the Premier Hotel.

This shows a yellow centre line & four lanes of cars without any lane dividing line. It also shows a Ford Escort & I've got one of these in my Shed, hopefully not here for much longer. Then I'll be able to extend the Main North - yeah right. 

Another photo from the Facebook group had me adding a Pedestrian Crossing with the overhead Sign.

I need to make some Bus Stop & No Standing Signs.  


My completed 400 mm Lambton Road Over Bridge. 

Because I didn't feel confident painting two lines, I used the 3.0mm Stripping tape I use for my Control Panels, cut down the middle & had to use Super Glue Gel to attach them to the matt road surface.

Made a Stencil for the Pedestrian Crossing after trying masking tape. Sprayed a few coats - done. 

I found a 13.0 mm plastic tube with a disc on one for the overhead sign. I found the "Legs" on the Internet but you Guys would be good at this. Using MS Paint program, I typed in "CROSSING" with the size 8 font again & moved it into the appropriate top of the Legs. Printed it but I'm out of colour on my Printers, glued it to the disc & corrected it with yellow paint. 

I mounted the sign using some .015" Phosphor Bronze wire & two wooden Skewers from the Kitchen. Now I'm the Cook, I'll never use them for Meals.

I finally found my HO painted "people", where some of them have found their way to Broadmeadow. I had to buy some Seats. 
I located a small Signal Box on the end of the platform for the North Broadmeadow Box, that finishes this Broadmeadow "diorama",

An overall view of my Broadmeadow Station. I'm very happy with it and have had a fantastic time researching & building it. Thanks a lot to the Broadmeadow Station & Loco Facebook group.
I'll "move on" to Sulphide Junction Station, that'll be my next Blog entry, then onto Hawkesbury River Station. Now that I've made some sandstone stations, I need to strike while the Iron's hot.


Monday, October 24, 2022

My Web Site has GONE - Bummer!!!!!. but pages are still available - see below

UPDATE: Click here for the Wayback Machine link. & go to the page you'd like to view & the web.archive url will be displayed. 

Using the example of a C32 decoder install, the displayed address, the url will be shown:

web.archive.org/web/20210609004259/http://www.members.optusnet.com.au/nswmn/32.htm

Place your Cursor at the start of the url & LEFT Click. 

A new url, beginning with "https://" will display shown below:

https://web.archive.org/web/20210609004259/http://www.members.optusnet.com.au/nswmn/32.htm

REMOVE the text after the "https://", shown in RED text above. including the "." after "www"

The new url will be shown and my original page is shown complete with photos that were missing on the Wayback Machine pages.


On Sunday 23rd October 2022, I clicked onto my Desktop Icon for my Web site. Instead of seeing the photo of the fantastic Garratt, I got this message:

Invalid URL

The requested URL "http://%5bNo%20Host%5d/nswmn/index.htm", is invalid.

Reference #9.159c3e17.1666644809.1b6ee226

THANKS Optus

With the help from Martin with his comment below and a Web Archive link of:

https://web.archive.org/web/20220311020340/http://www.members.optusnet.com.au/nswmn/


Martin you're the Man, this helps a lot, THANKS Martin.

How long can the "archive" site work? 

So for now when "googling" me to find my web site, searchers will find my Blog and see this link.

I will ring Optus to see if they can fix it.

Without having rung Optus my provider, I found that all urls NOW have to have an "S" in the first few letters of the url. (https://). Some of my computer geek mates told me this "s" thingo was around for years. Optus may have a quick fix but......

Back when I had to switch over to the NBN, I contemplated changing to another Provider but decided to keep with Optus due to I wanted to keep my web site, so I stayed with Optus. 

So now I have decide what to do with my web site.

I had a Counter on my Home page. Feb2018 showed I had 13,000 Visitor since I added the Counter. That panned out to approximately 300 Visitor per month. This determined that I should keep my web page going. Today it shows 23,000, so for 54 months 10,000 Visitors. That's now 187/month. 

I have purchased a Domain name but I'm having reservations about using it.

My mate Randall suggested I could add my popular web pages to my Blog. Topics like my Stay Alive & DCC Novices etc could be added to my Blog. I cannot comprehend editing my DCC for Novices Book, there was lots of good information there. Just yesterday I had reason to show another mate some tips on installing Decoder Pro. 

I'm not up to doing this at the moment but will I ever be up to it.

I'll ask you guys who read my Blog, what "pages" I should add to my Blog & for possible suggestions of what to do, while I ponder on whether I do anything. If any of you need a particular page, I can email you what I have in my Documents Folder & applicable photos etc.

Please let me know with a Comment here.


Wednesday, October 5, 2022

Bringing back the Wheat Terminal in Port Waratah.


Years ago I upgraded my Port Waratah to better handle my Newstan Coal trains that were operated regularly during my Operating Sessions by replacing the Wheat Terminal with the Newstan Coal Loader.

Adding the 48s to Werris Creek, I introduced the running of a 1,000 ton Wheat train from Werris Creek to Port Waratah comprising of 16 BWHs & Van hauled by double 48s to Willow Tree where the train needed to be rear end banked up the 1 in 40 grade to Ardglen by another 48 (in my case 4801), using a second Operator.  I did a YouTube video of operating this train through to Ardglen. The train Operator ran on to Port Waratah, click here to see the video

Arriving in Port Waratah the Wheat train had nowhere to be stored & blocked up the mainline track through Port Waratah while the Operator shunted the Van around & left the double 48s on the Newstan Sneak Path, inconveniencing the Operators of the Newstan Coal trains.  

I fixed this dilemma by repositioning the Coal Loader Sidings towards the backdrop a little, reducing the length of one of Empty Newstan BCH Sidings & extending the Siding allocated to the Vans, to now accommodate the BWH Wheat train to the doorway into the Crew Room. 

I added a 1.0 metre "lift up" section of track, stored under Port Waratah that when required for the Wheat train, is swung up, extending into the Crew Room.

This addition made this new Siding 2.7 metres long, just long enough to keep the Wheat train including the double 48s, out of the way of other trains running through Port Waratah. This was just a test set up that's now good enough to be in place permanently.

I re-installed the Walthers Concrete Silo Kit to the end of the shelf with the Unloading Shed hard up against the fascia. This kit is not very prototypical for us NSW modellers but better than having a pretend Wheat Terminal.

I made cutouts in the Silo so as it would fit over the 2 Newstan BCH Empty Sidings for the Empty Coal train (22 BCHs). I still have to replace my cardboard box Newstan Coal Loader. 

The Port Waratah trackage tapers down to provide the widest entry point at the doorway as shown below.

I laid a piece of track over the angled hinge point, temporarily securing it with track pins then cut the track with the Dremal, to test the hinge/track setup.

I added track  to the end of the lift up section.

To my amazement, the 48s & BWHs negotiated the hinge cut, without any  derailing, so this temporary setup is now permanent.

I added 3 pieces of 3 mm MDF for sides & the End of the "lift up" section. 

I added a Peco In Track Magnet allowing for easy remote uncoupling of the wagons when the 48s are hard up against the MDF End Stop.


The Operator runs the Wheat train into the new siding until the 48s hit the End Stop, that positions the appropriate couplers over the Magnet, ready for disconnecting the BWHs from the 48s for the return Empty Wheat to Werris Creek. 
 

This is the Operators view of the Wheat Terminal from inside the layout, with the two Main North Bridges, down. 
 

While the Operator shunts the Van into a Siding with 4803, the 16 BWHs are mysteriously unloaded & the Wheat train is ready to be run back to Werris Creek by the same Operator or someone else during the Session, maybe.

The empty Wheat train now weighs less than 400 tons so a single 48 is all that's necessary for 1 in 40 grades to Ardglen, leaving the double 48s at the end of the "Lift Up" track. Note: My Trainorama 48s cannot haul the Empty train up my Ardglen Bank while my latest Powerline 4803 can. Hence the necessity of having 4803 parked in Port Waratah, prior to running the Wheat train.

Retiring for a Cuppa etc, I open both the Main North Lift Up Bridges to their stowed UP position so it's an easier exit for all Operators, to the Crew Room. 

If the Wheat Train Lift Up track is UP & the Empty Wheat train is still there, I'll pull it off the Lift Up Track with 4803 & place the 2 48s by hand, into the Werris Creek Diesel Terminal. With nothing on the Lift Up Track, then I'll stow it back under Port Waratah. 

Thursday, September 8, 2022

Improving Sydney Staging Route Indication.

With my previous Control Panels, the appropriate road/route is indicated by illuminating the Green LEDs using one pole of a 2PDT (2 Pole Double Throw) or 4PDT Toggle Switches but as I'm substituting the Toggle Switches with a Diode Matrix for Sydney Staging, I have to use something else. In this case I'm using Microswitches that are operated by the Point's Throw Bar, after experiencing intermittent operation of Point motors, piggybacking a Peco Accessory Switches.

To indicate "occupancy" of the hard to see Loop/Road for an Operator entering Sydney Staging, I made 5 Occupancy Detectors on a piece of Veroboard, shown below. Occupancy is detected by passing the applicable Track Feeder through the Doughnut transformer 3 times, similar to what I did for the Armidale Control Panel.


With Armidale Staging, I used Bi Colour Red/Green LEDs for the LAST LED, connected to the two pink wires at the left, for each of the tracks on my Control Panel, indicating that the Road/Track is "Full" (occupied), by illuminating the Red LED.


I don't want a lot of LEDs illuminating on my Control Panel - only the appropriate ones for the selected route. Using the above method, the Operator had to press the Track Push Button or in my Armidale Staging, operate the Toggle Switch, to find the occupied roads. 

After installing Point Motors, a Diode Matrix, Capacitor Discharge units & a Control Panel for Sydney Staging route control, I had a visit from Erik & Randall where I demoed my efforts.

Erik suggested that it would be better if the track "occupied" Red LED was illuminated all the time. This would make it easier for the Operator to see which route/road they'd have to set, just press a Switch for any track, not in the "Red".

This new concept needed a lot of thinking how to do this. As the Occupancy Detectors only get 12 Volts when the track is selected from the combination of the Microswitches, shown below. 


How would I do it?

How could I provide 12 volts to the track indication circuitry that was not selected due to the Microswitch action removing power to the circuit. Initially I added a small Relay as I have with my Occupancy Detectors for my Signaling Detectors where the Relay is energized when the appropriate track is "occupied", supplying 12 Volts that would keep power to the Detector, shown in the below schematic. Selecting another track, the previous track if occupied, kept the Red LED illuminated.


It worked only when each push Button was pressed - Bugger.

Having very basic skill in electronics, I needed to solve this with "something" basic.

I added another Relay with a 470 uF Capacitor in series with the Coil, shown in the above schematic on the L/H bottom corner. On power up, this relay supplies 12 Volts to ALL 5 Track Detectors for a 1/4 of a second, long enough time for any of  the Detectors that sensed occupancy energizing it's own small Relay that supplied 12 Volts to "itself". This resulted in Red LEDs illuminating for ALL the occupied tracks with only the "selected" Track's Green LED, illuminated. 

It works.

Shown below with the appropriate LEDs illuminated with Track 1 selected.


Shown below with Track 5 selected.


The overall view with Werris Creek (top) & Sydney Staging (bottom) with the LEDs illuminated showing the route an Operator has selected (Track 1) & Tracks 3 & 4 are "occupied", to run through Sydney Staging, a common running of trains on the Main North as their Operator runs back to where they came from. 


I've finally added a second Control Panel to Sydney Staging, connected "in parallel" to the Main Panel that allows Operators to "start" their "staged" train, without going to Main Panel. I added a Crossover that's used only for the Northern Tablelands Express & now for returning the 46 Bankers to Hawkesbury River Station Siding.
With some help from Andrew, I fixed the Occupancy Red/Green LEDs circuitry. 


Time will tell how my circuit "logic" survives.
 
This project started 6 weeks ago where I spent heaps of time making this work & it has been fun.